Notice: Function _load_textdomain_just_in_time was called incorrectly. Translation loading for the simple-automatic-updates domain was triggered too early. This is usually an indicator for some code in the plugin or theme running too early. Translations should be loaded at the init action or later. Please see Debugging in WordPress for more information. (This message was added in version 6.7.0.) in /www/webvol9/zw/zp5l3omdwvnywwk/mitchhy2002.com/public_html/wp-includes/functions.php on line 6170 TUTORIALS – Page 3 – Kyutipie_Misay
[WATCHinHD] Hello Superfriends! I’m back sa balakubak! I made my easy dulce de leche cake. Yema cake na madali lang gawin.
☕️ ingredients:
6 pcs. eggs (separated)
1/2 cup sugar for the egg yolks
1/2 cup sugar for the egg whites
162 grams of flour (or cake flour)
1/4 cup oil
1/3 cup milk
1 tbsp. vanilla
1 tsp. salt
1 tsp. baking powder
1 can of dulce de leche
1/3 cup milk for the frosting
pinch of salt
☕️ baking : for 160°C for 40-45 minutes, check toothpick test
Want to earn extra income from posting online? Be an affiliate -magpost & share ka lang sa social media mo at kikita ka na.
Sign up here👉: https://invol.co/cl8ic5b
♥ BUY in LAZADA Together Lights Up the Moment : Up to 17% OFF + FREEBIES worth 1499
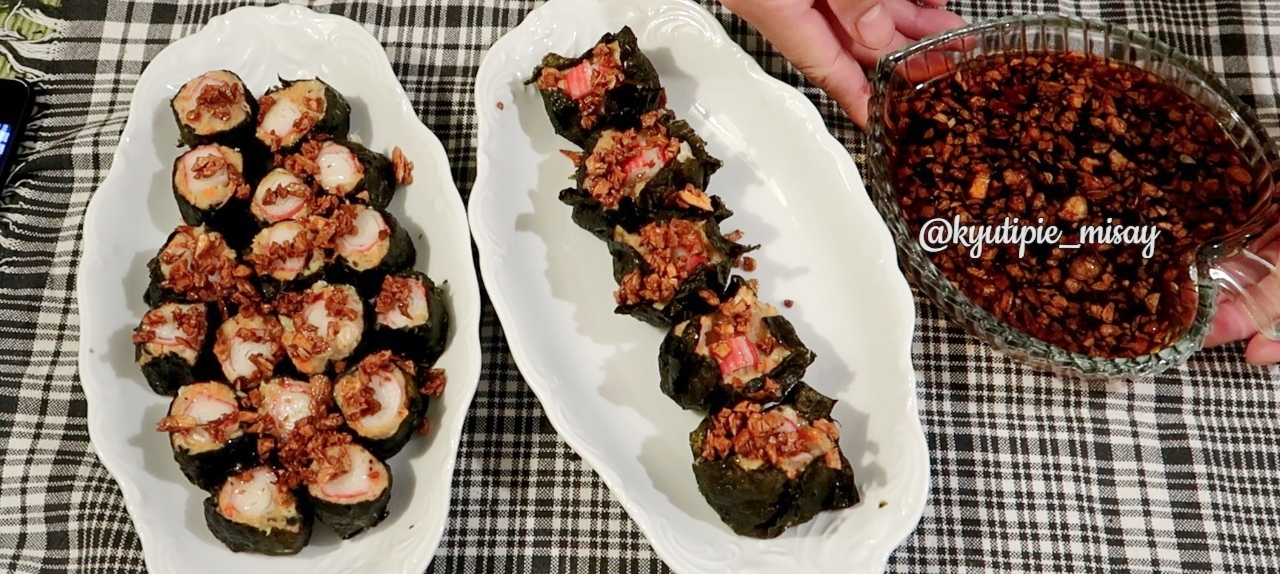
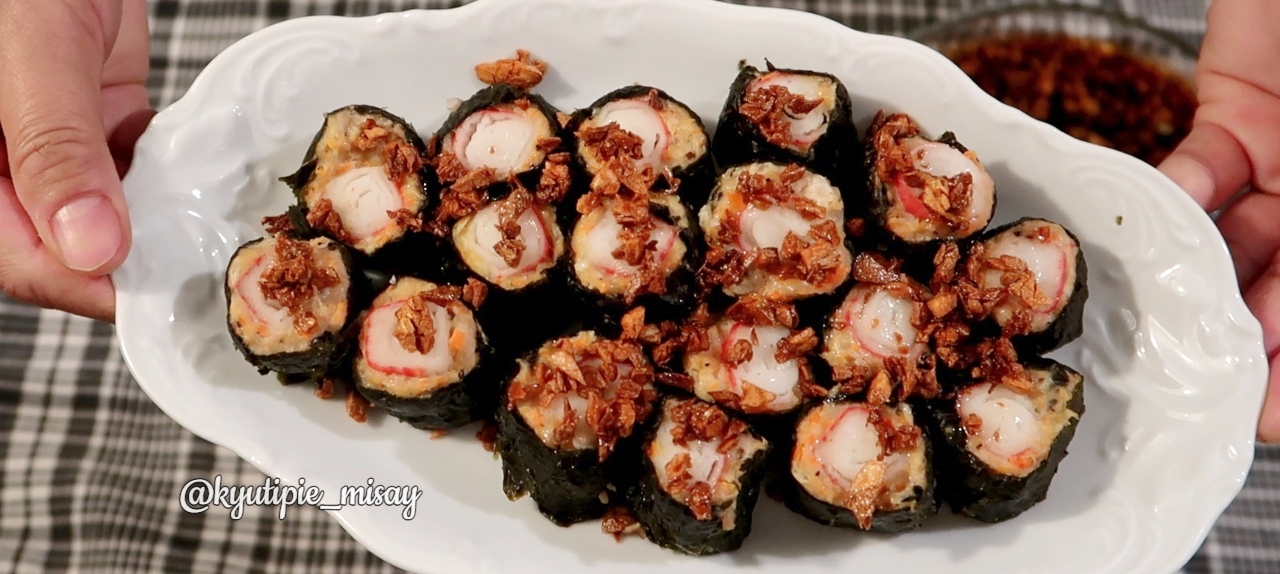
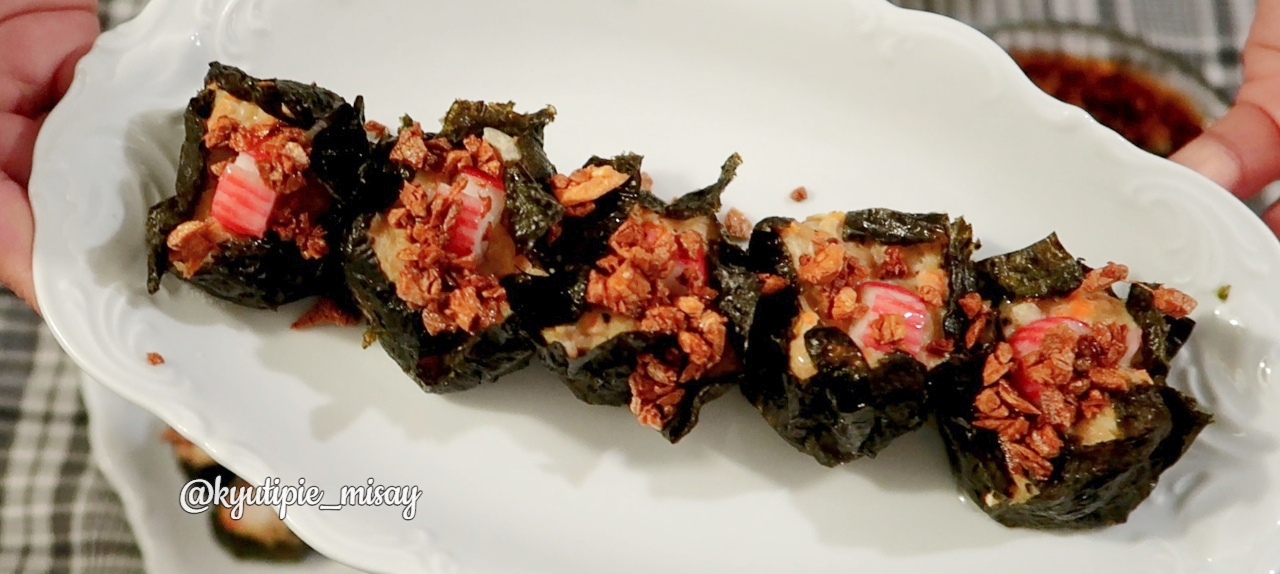
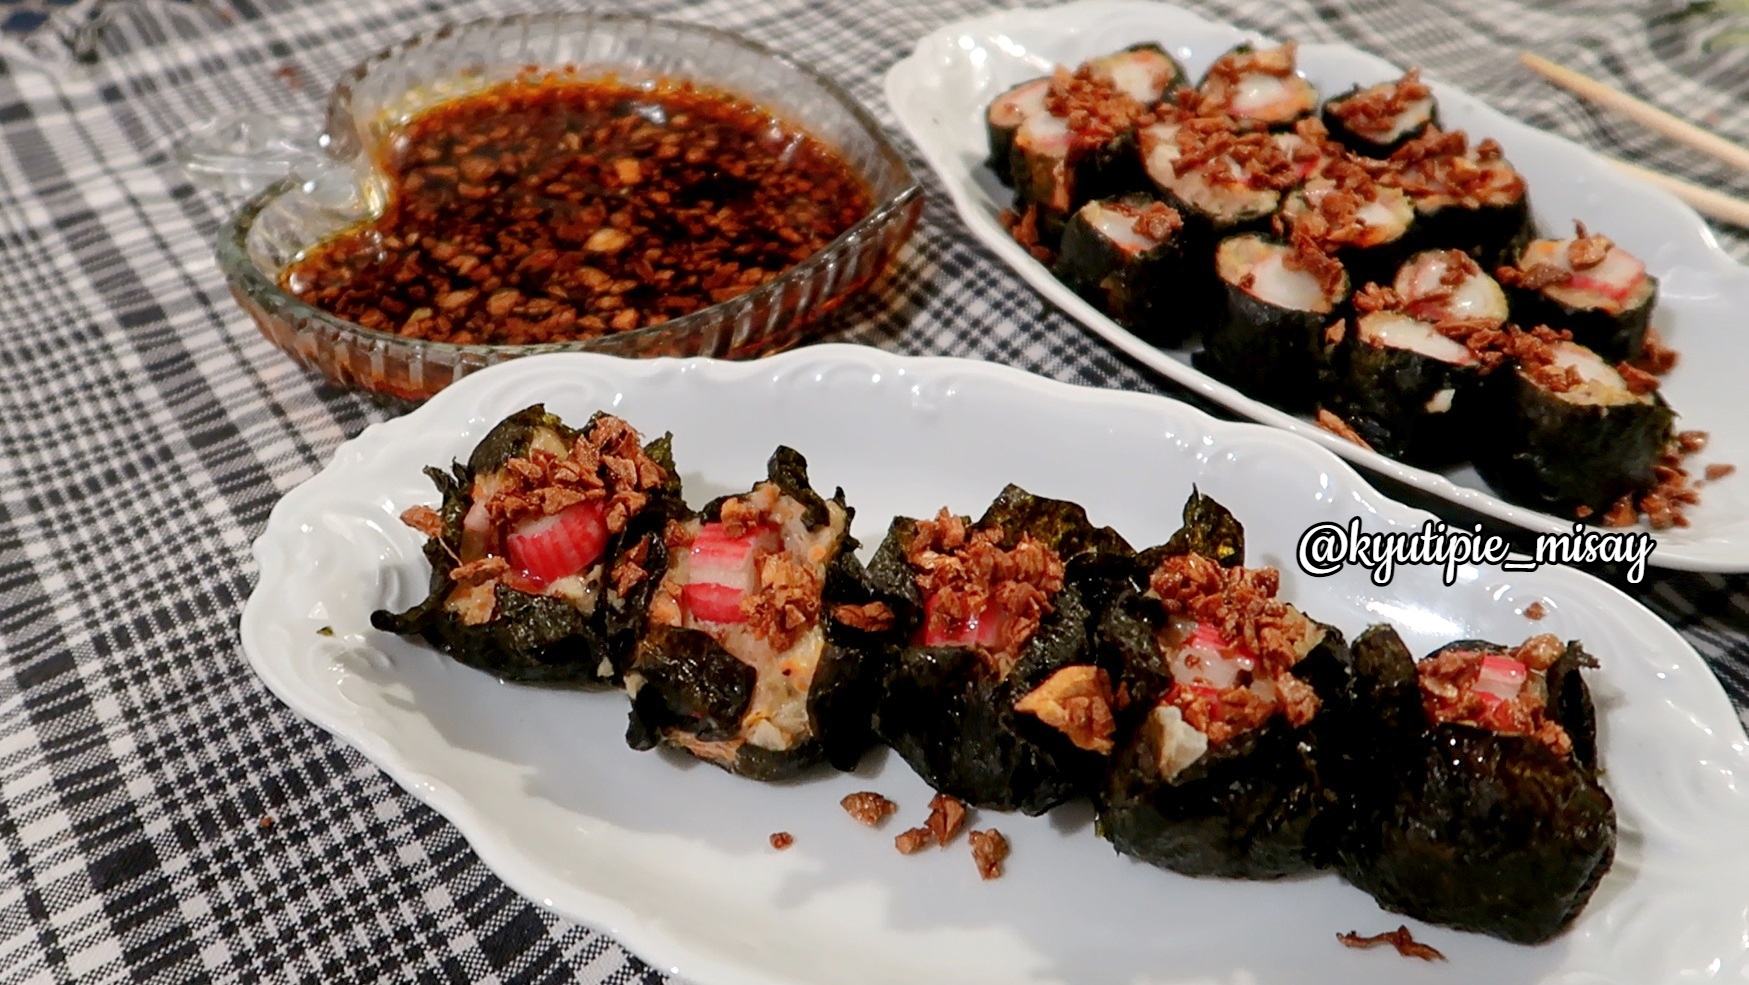
Here is my easy homemade Japanese Siomai recipe, sobrang dali lang gawin at napaka sarap pa! pwedeng pang business or simpleng pampulutan! Hope magustuhan nyo ang recipe ko guys 🙂
☀ Japanese Siomai Ingredients:
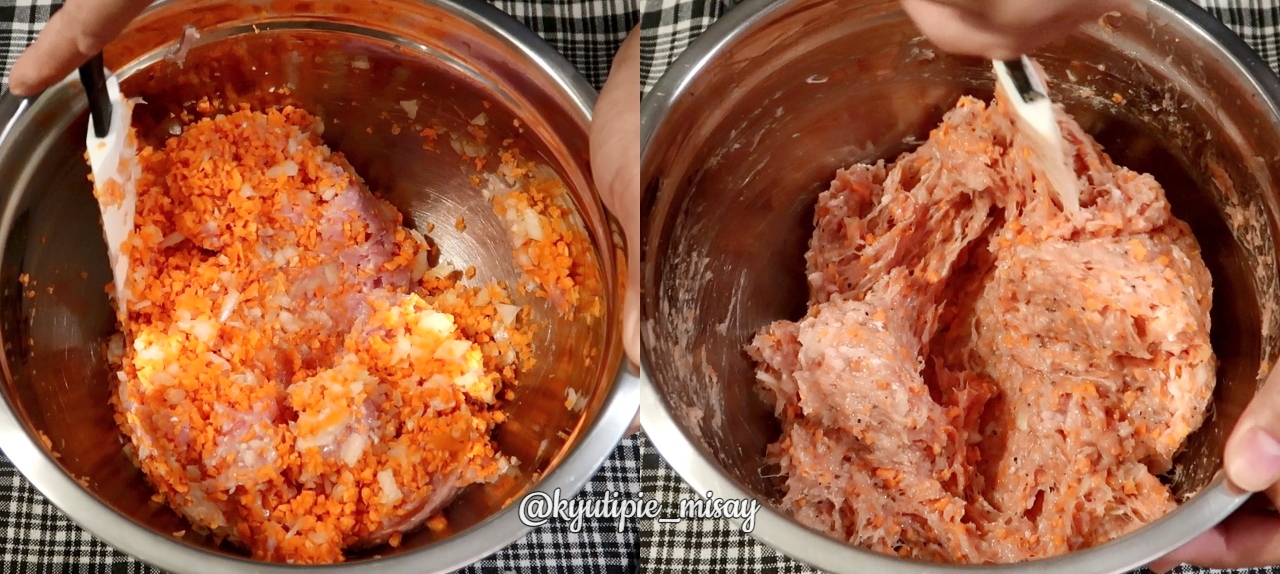
500g ground Chicken (u can use pork or beef)
2 small carrots – minced
1 teaspoon ground pepper
2 teaspoon sesame oil
2 teaspoon oyster sauce
1 egg
½ teaspoon salt
1 teaspoon sugar
1 teaspoon flour
1 teaspoon garlic powder
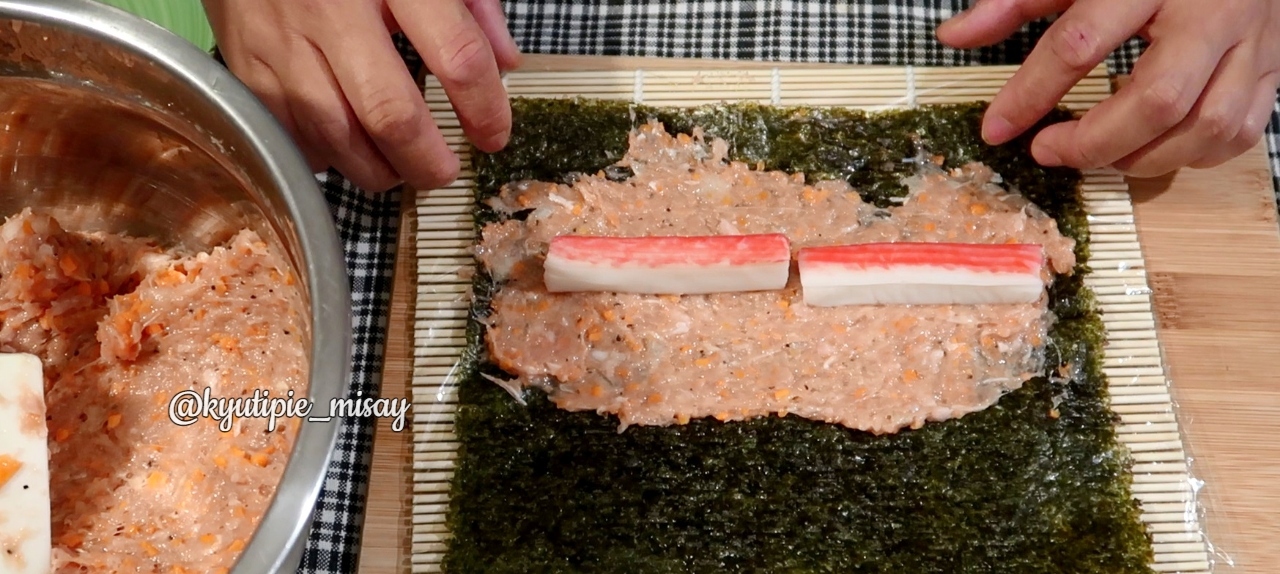
5-6 pieces crab sticks (surimi)
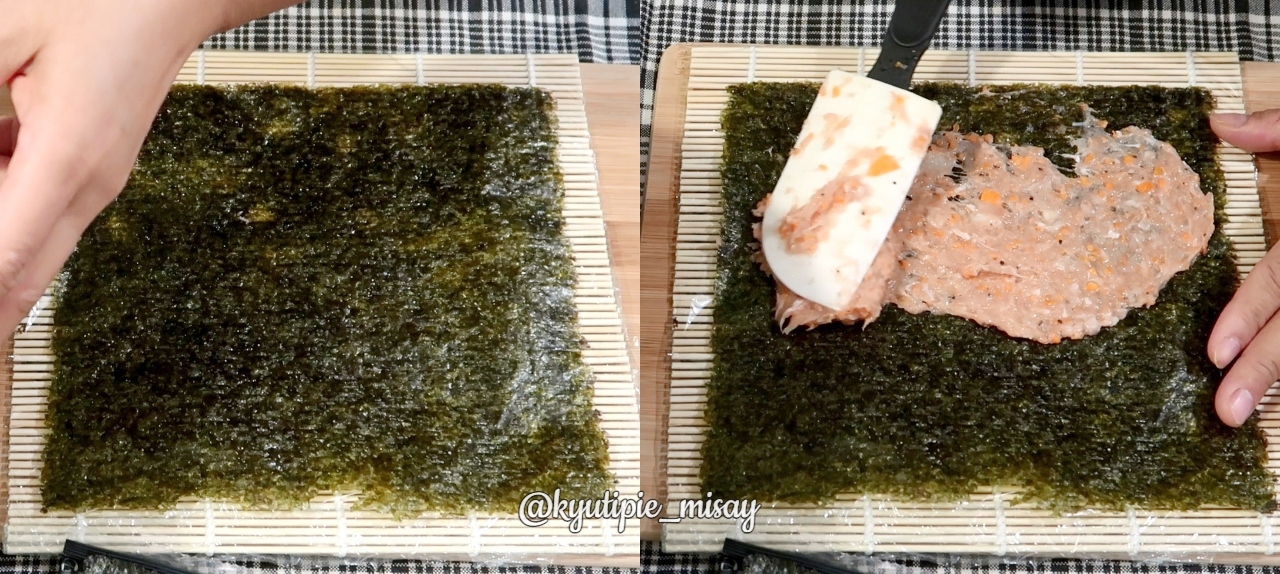
1 pack of Nori wrap
☀ Instructions :
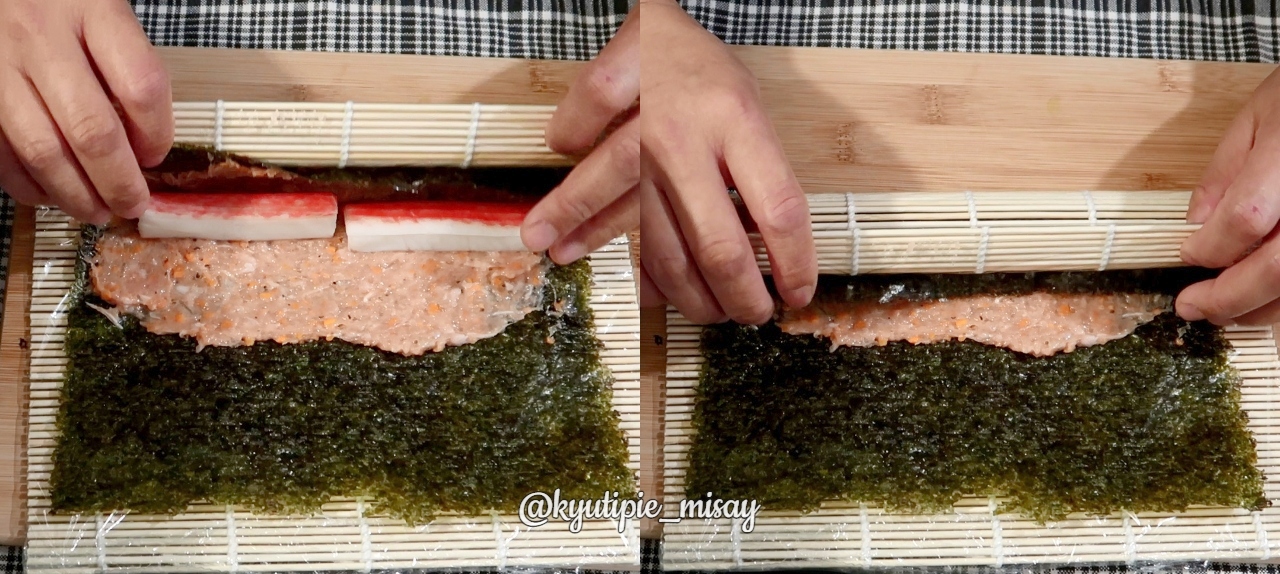
1. Combine all ingredients, except for the last two, in a bowl. Mix until well blended. Cover and let it rest for at least 30 minutes.
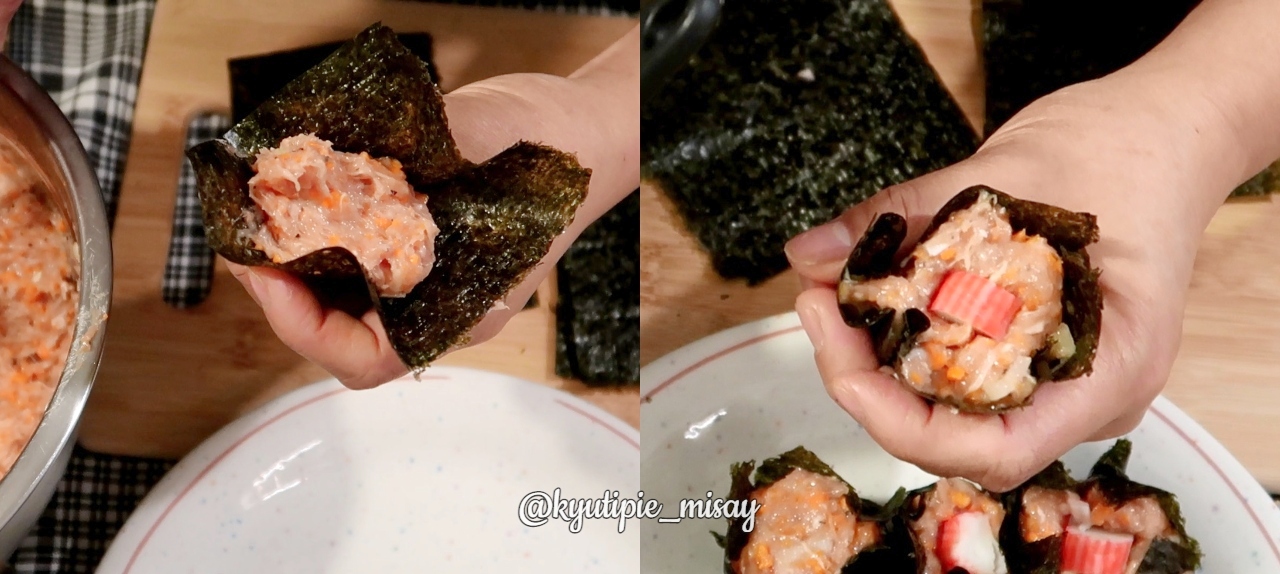
2. Lay a Nori wrap on a flat surface. Spread the meat filling evenly. See photos below.
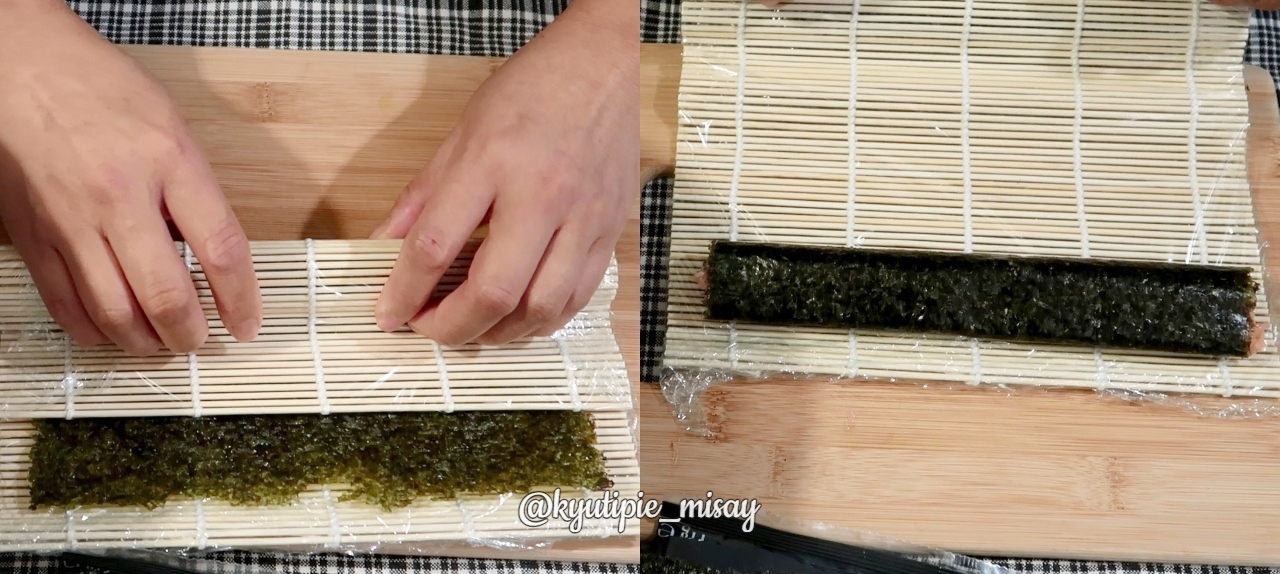
3. Arrange crab sticks/surimi at the middle of the meat lengthwise.
4. Wrap like you would a sushi. Cut into pieces each roll.
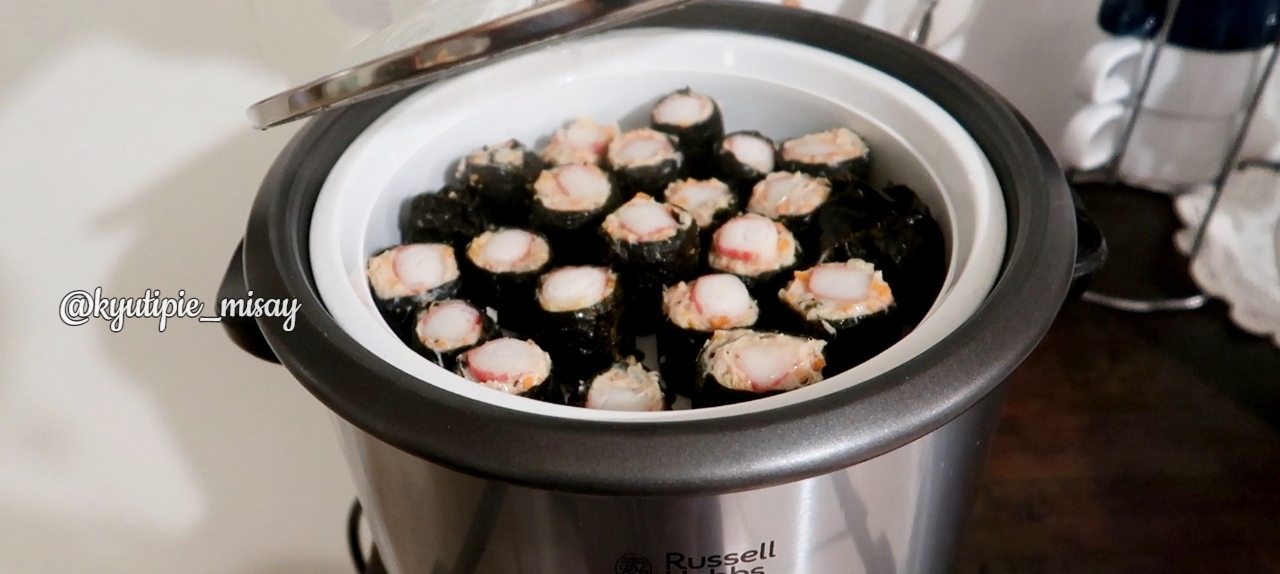
5. You could also wrap it as a regular siomai. Just cut the nori sheets into s square size.
6. Steam for 30-45 minutes or until meat is cooked.
7. While waiting, prepare the dipping sauce. In a small pan over medium heat, add oil and garlic. Cook garlic, stirring often, until browned and crisp.
8. You may serve them separately, topping the Japanese Siomai with fried garlic and then the sauce or you may also add the sauce to the pot of browned garlic and let it cook for another minute.
👉 Want to check my PORK SIOMAI VIDEO :
Want to earn extra income from posting online? Be an affiliate -magpost & share ka lang sa social media mo at kikita ka na.
Sign up here👉: https://invol.co/cl8ic5b
♥ BUY in LAZADA Together Lights Up the Moment : Up to 17% OFF + FREEBIES worth 1499
DISCLAIMER: Items were purchase with my own money unless otherwise stated. All opinions are honest and my own!. This post contains affiliate links, which means I may receive a small commission for clicks and purchases made.
I hope you all enjoyed watching my video and if you did please don’t forget to tap my back with BIG like 👍 and subscribe if you haven’t yet.
PLease leave comment down below. I would be happy to read it all ..💜💋
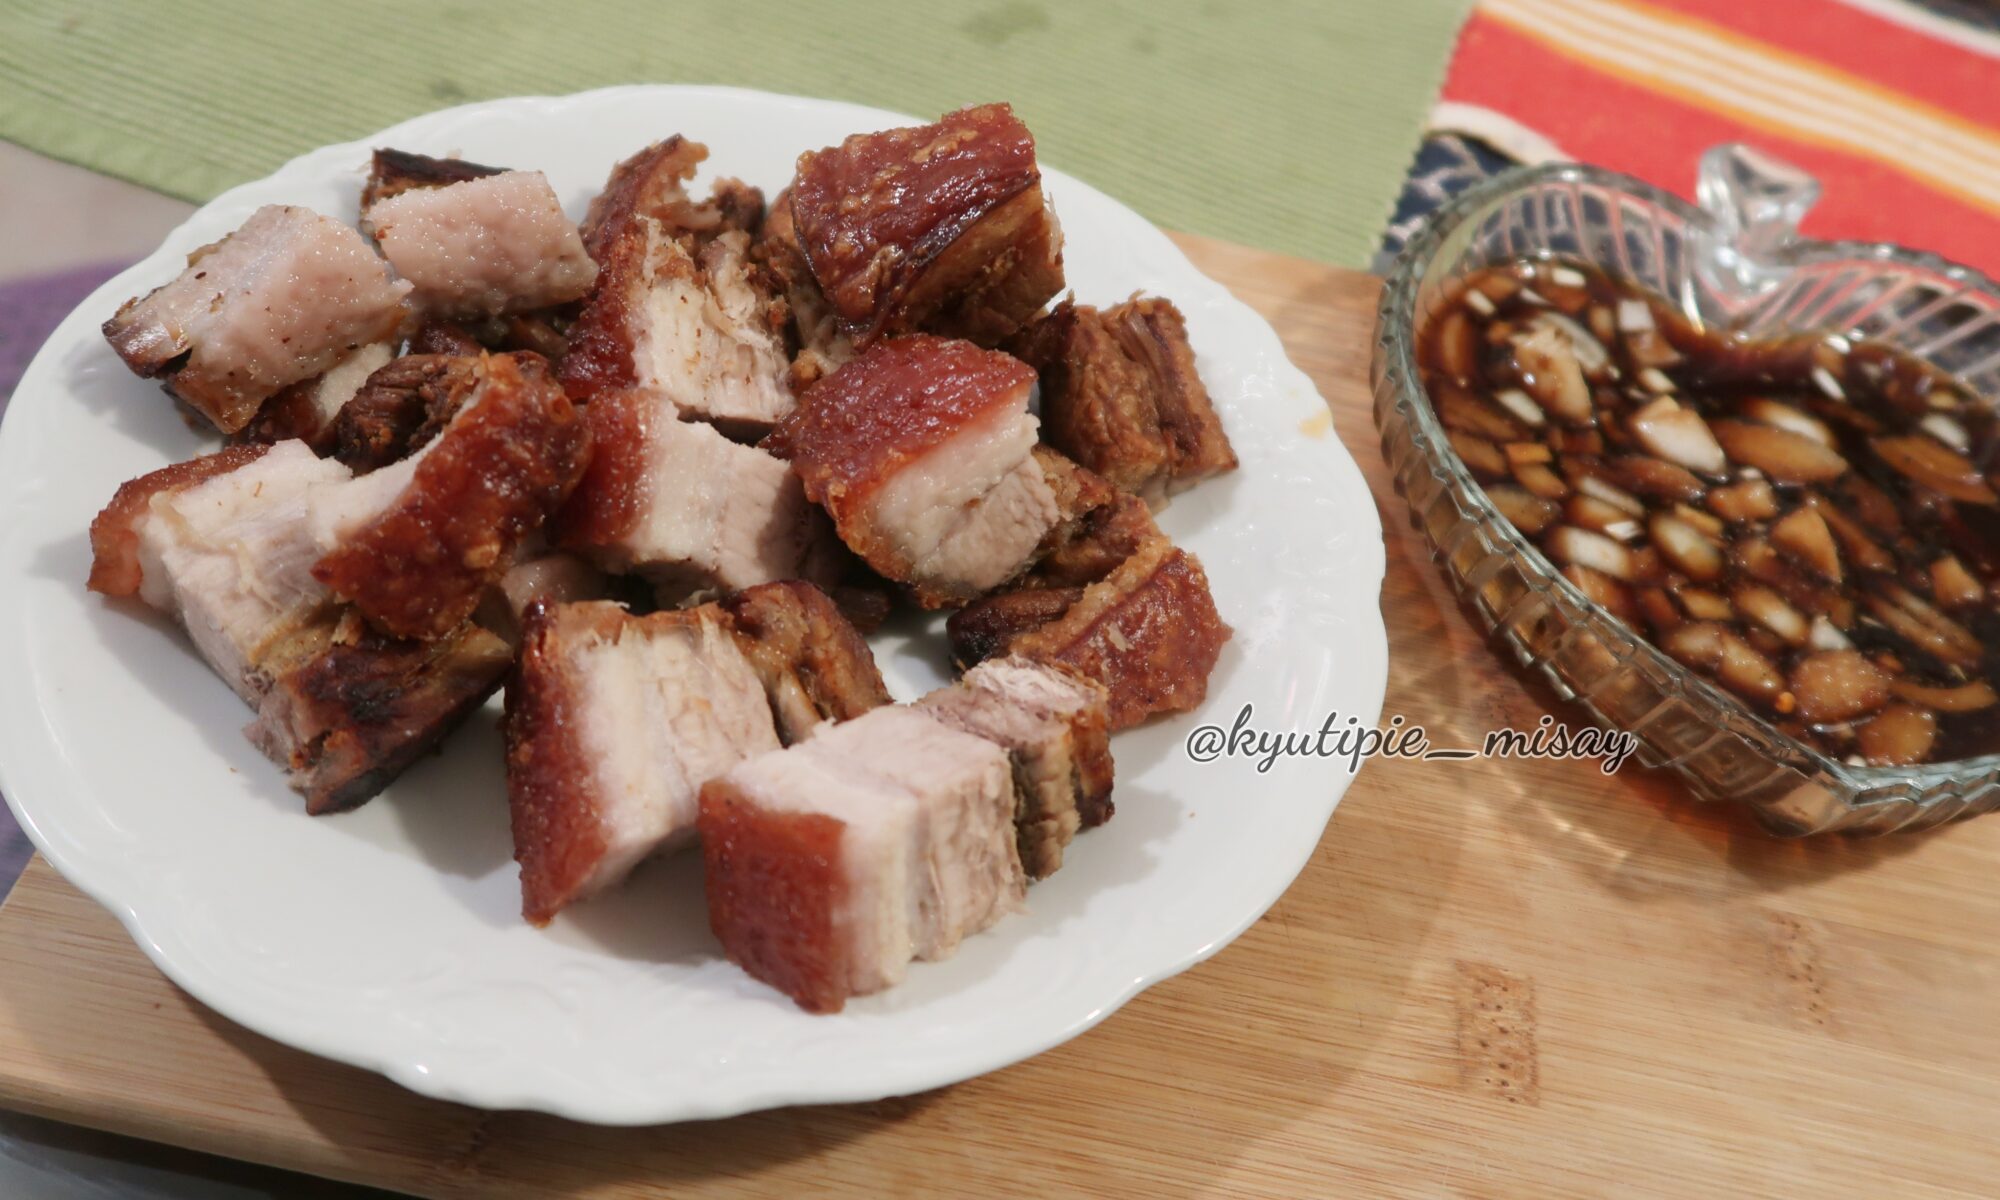
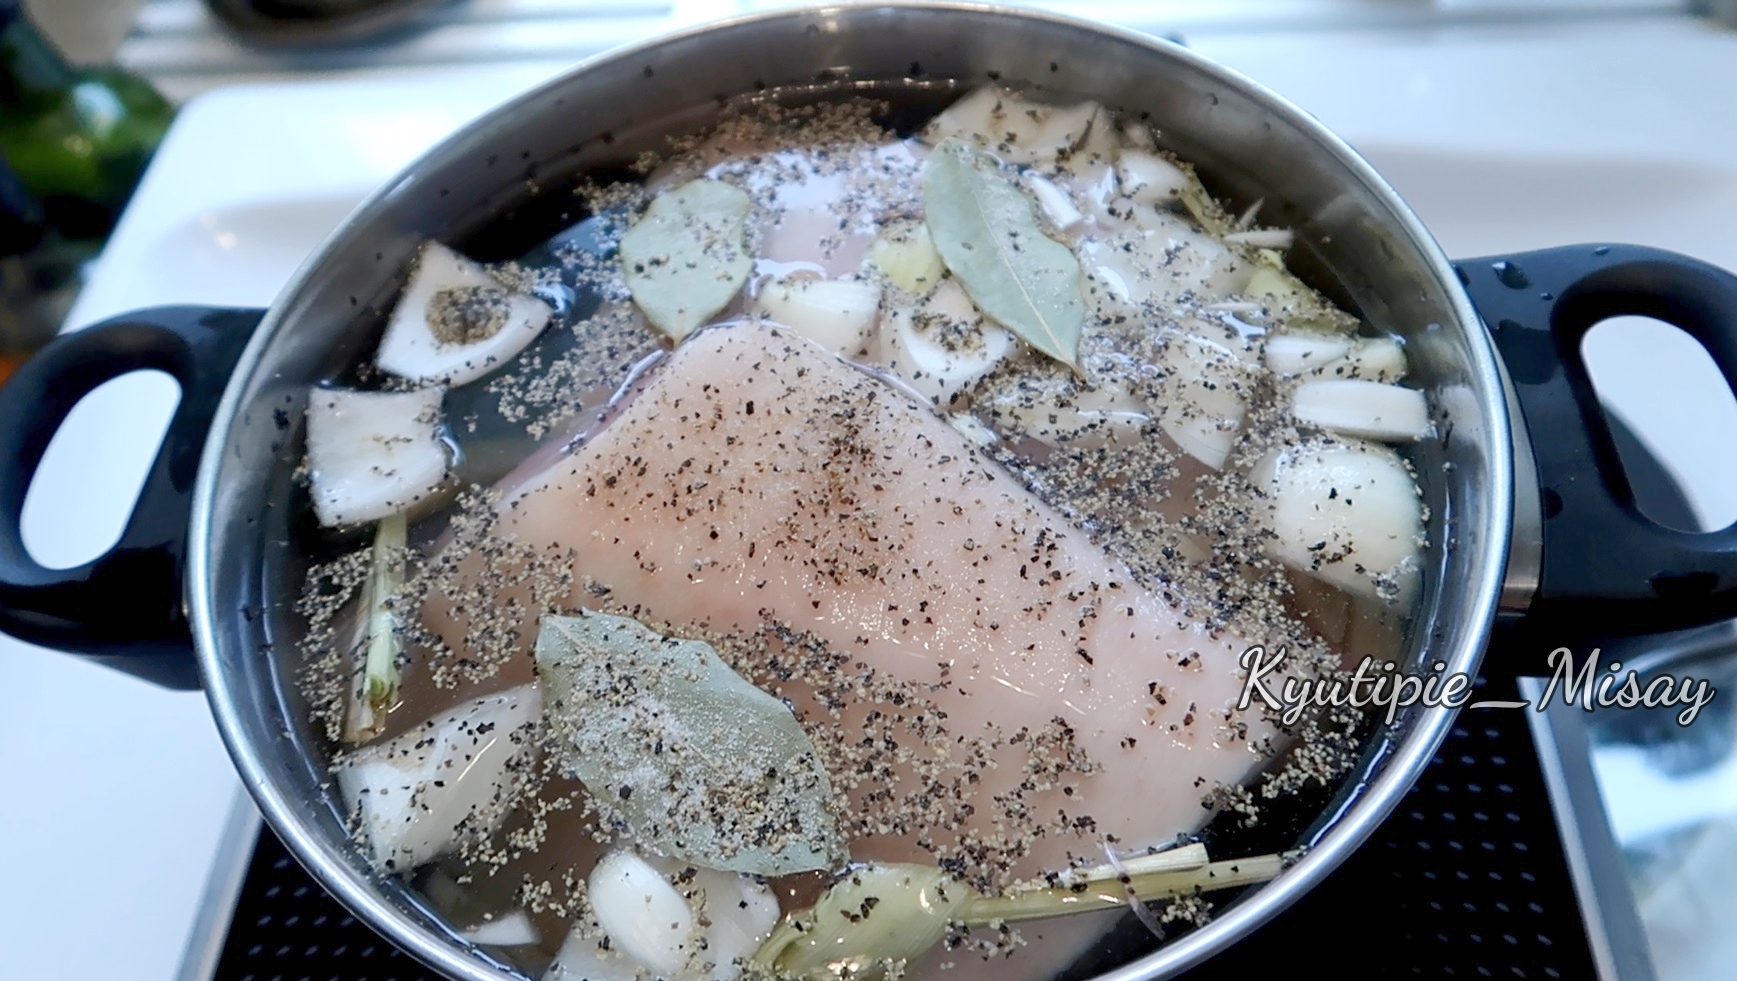
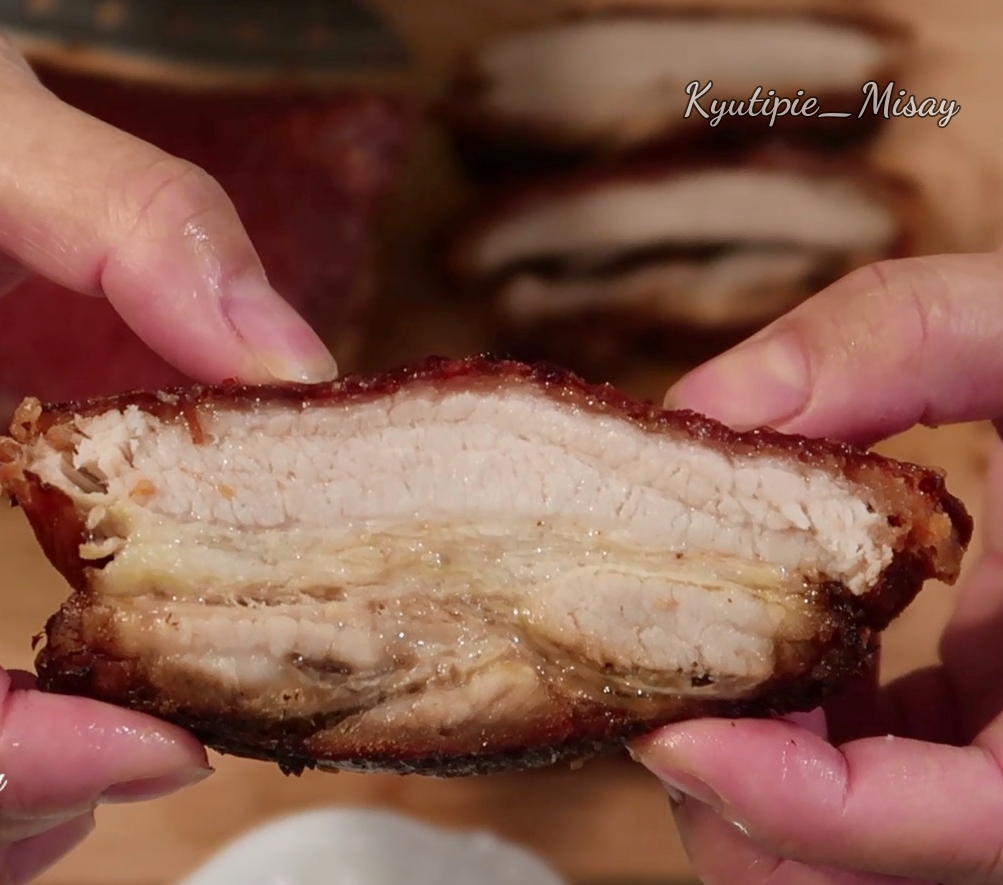
Hi everyone, in this video I will show you how I make my Crispy Pork Belly (LECHON KAWALI) using air fryer at home. This is the easiest method I know to make the perfect crispy pork belly without using oil. Yup! if you are afraid in cooking any kind of deep fried food, this one is really best for you. Using only the airfryer will make you life easier Lol. I’m sure you will going to like it too!
Crispy Pork Belly or also known as Lechon Kawali is the classic Filipino dish of crisp roast pork (lechon) cubes originally deep-fried in a kawali (skillet).
The air fryer that I’m using is PHILIPS AIRFRYER XXL COLLECTION – HD9650
Fresh pork belly
Bay leaves (laurel)
Onion (sibuyas)
Garlic (bawang)
Pepper (paminta)
Lemon grass (tanglad)
Salt (asin)
Pot of water (tubig)
Air fryer – Philips Airfryer 👉 https://amzn.to/2OLIN0h
🍲 Instructions
1. Place the pork belly in a large pot. Add lemon grass, onion, garlic, black peppercorns, and bay leaves. Pour enough water to cover it.
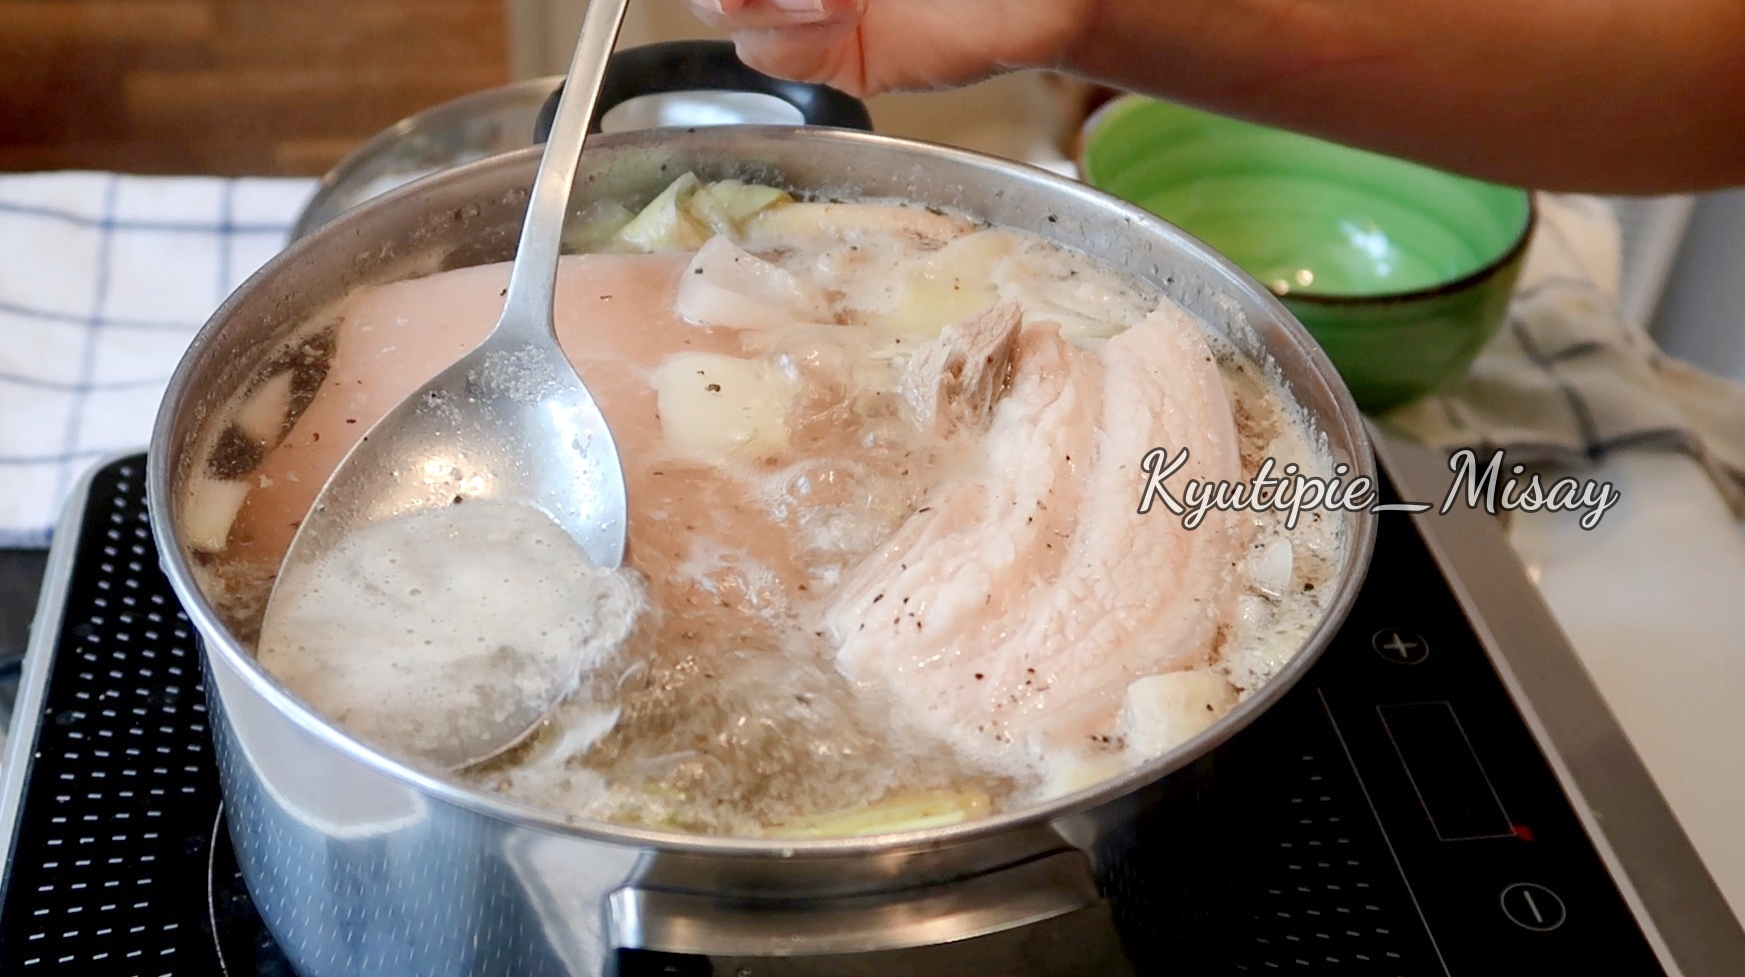
2. Bring to a boil then simmer until tender, about 35 mins.
3. When it is about to boil you will start to see the scum and fat floating on the top. Start to scoop it with a mesh sieve or a spoon.
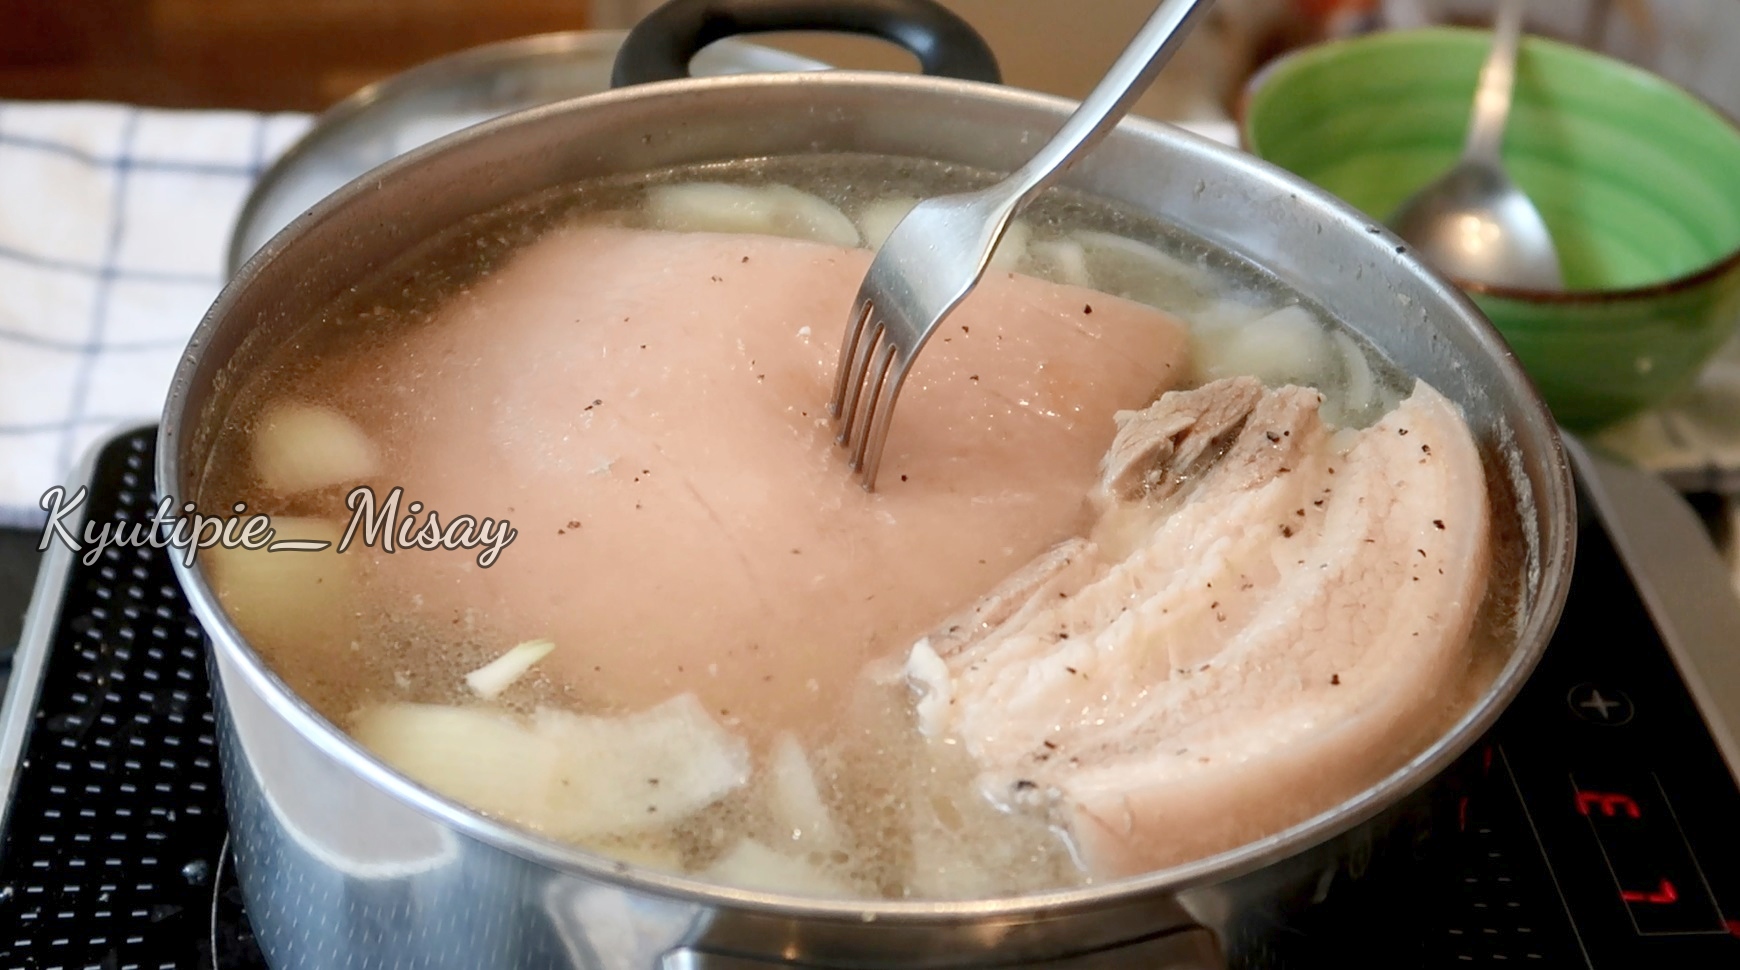
4. Its done when you easily poke it with a fork.
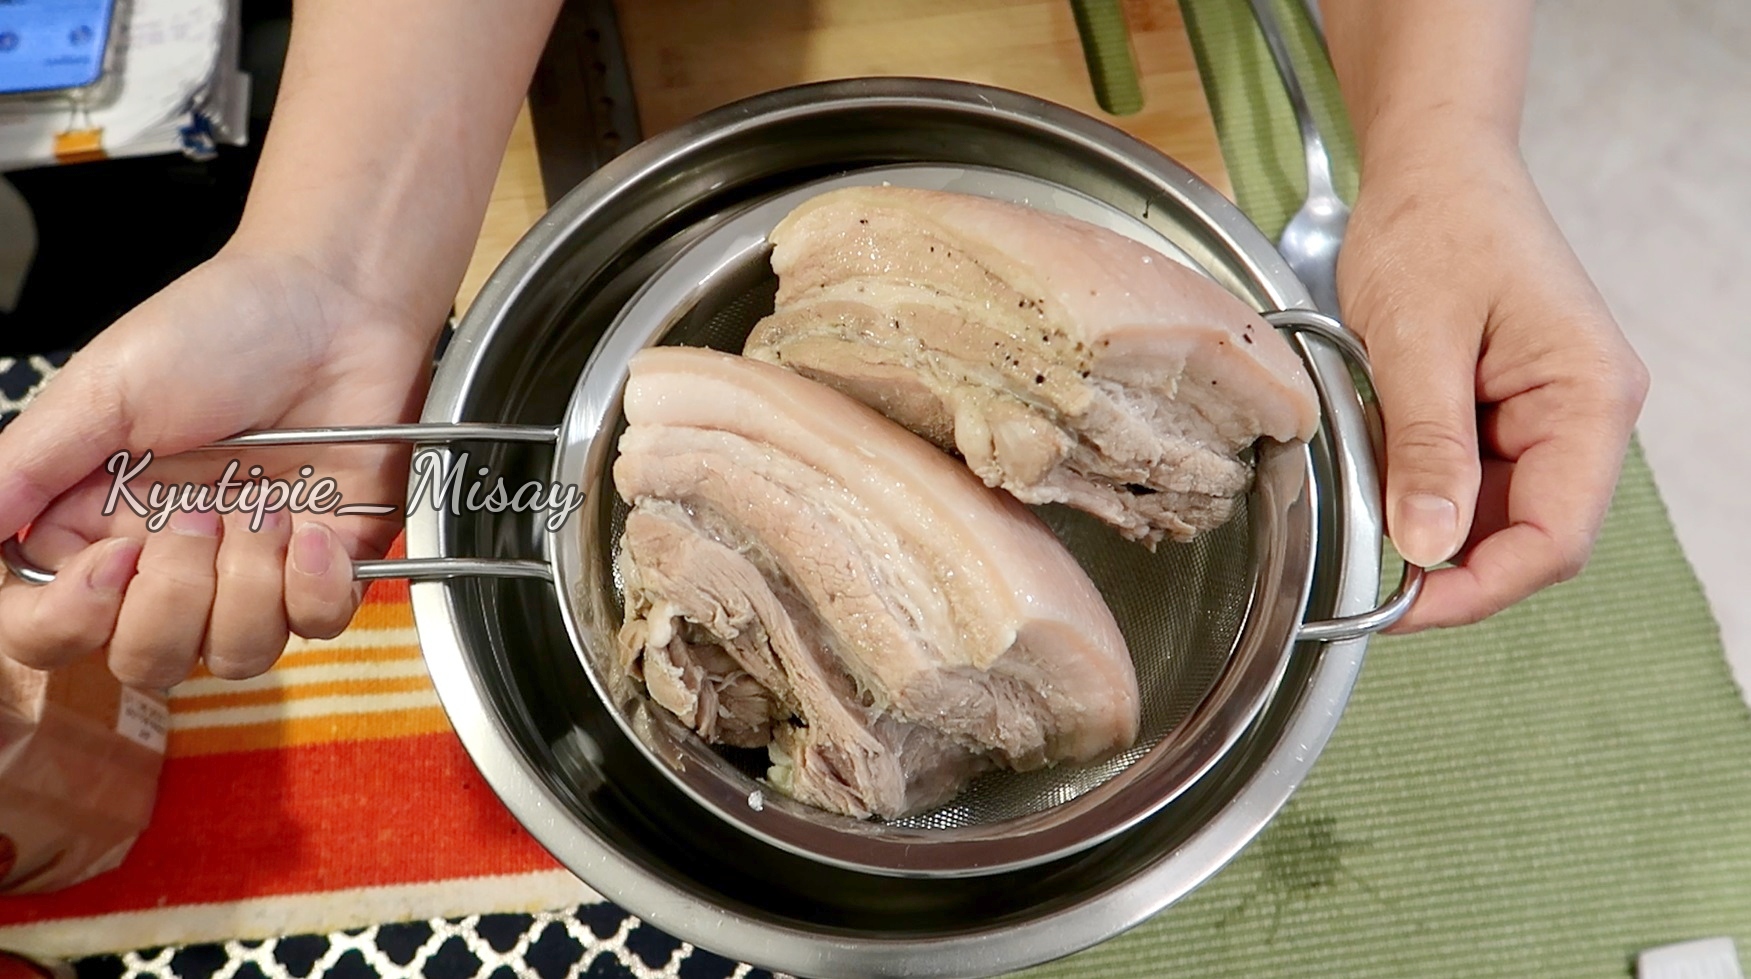
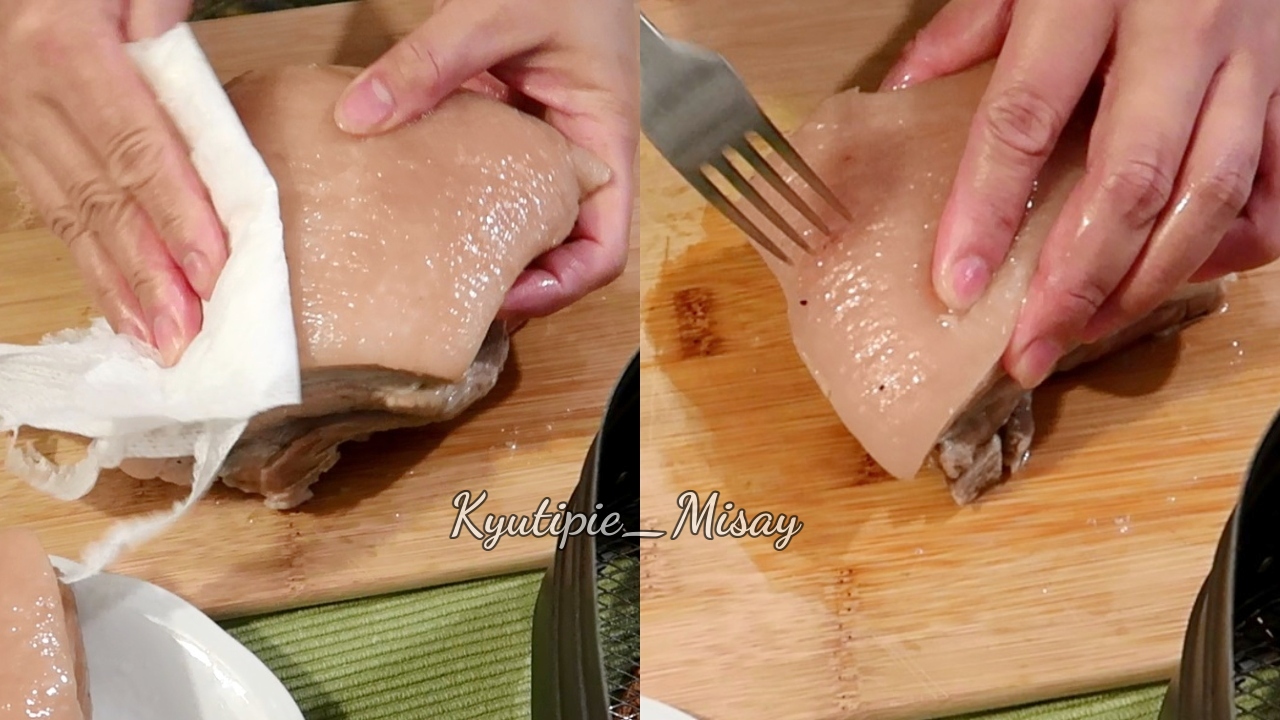
5. Remove the pork belly from the cooking pot. Drain it and place it in sieve and let it cool down until you can safely handle it with your hands.
6. Once cool, pat it dry using paper towel to remove excess water from the skin.
7. Using fork, poke as many little holes as possible.
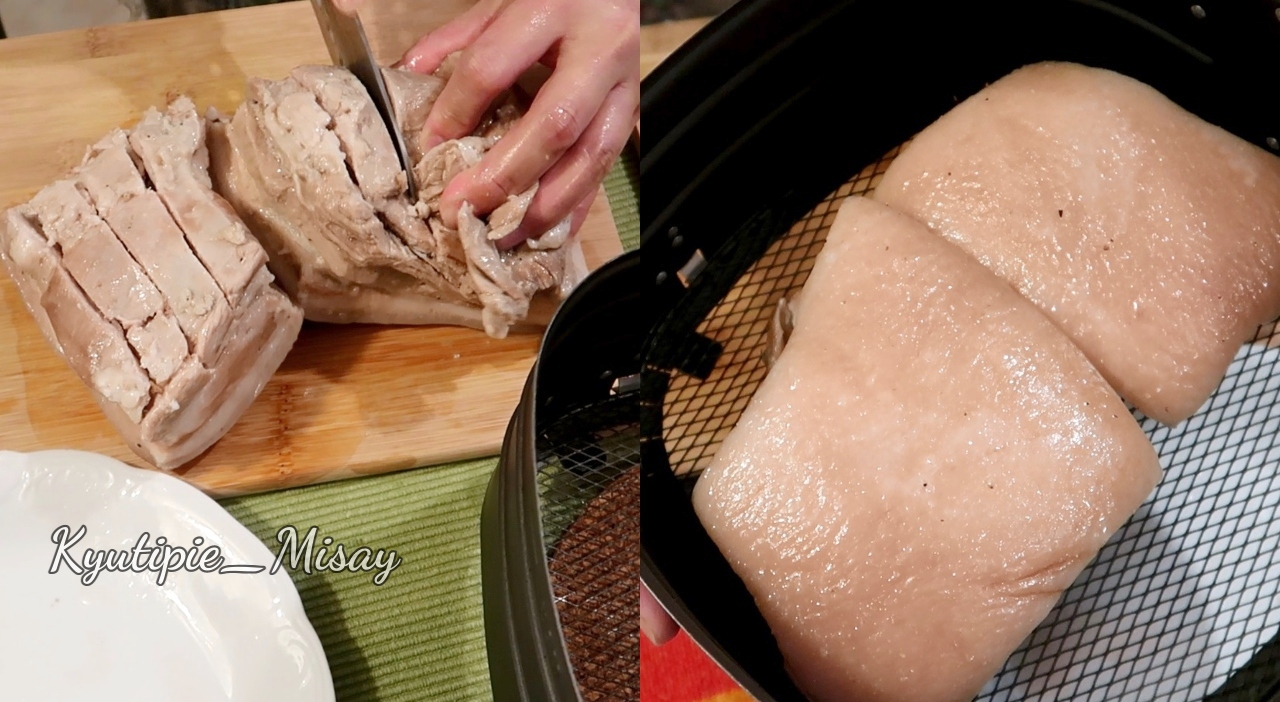
8. Make a small cut on the meat part of the pork belly and rub small amount of salt all over the pork and always pat it with a paper towel.
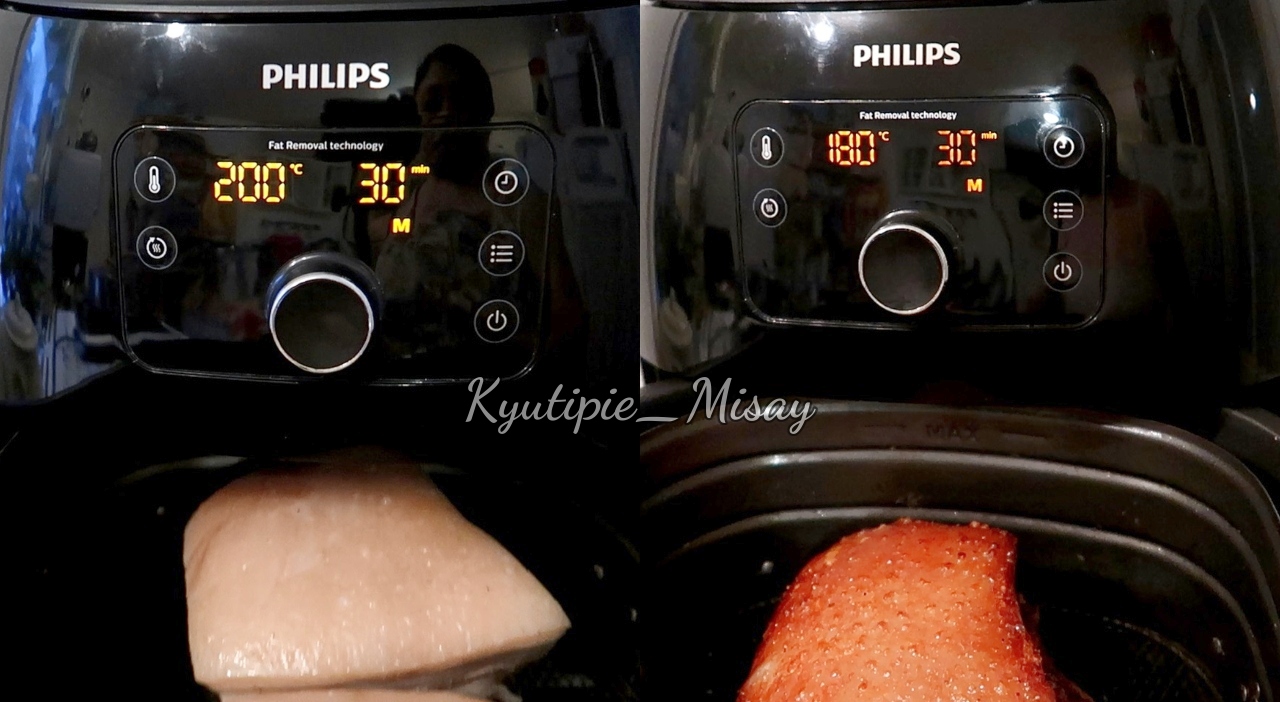
9. Place it in the basket of the air fryer. Close and set the timer for 30 minutes, 200 degrees C.
10. After 30 mins decrease the heat to 180 degrees C and air fry for another 30 minutes.
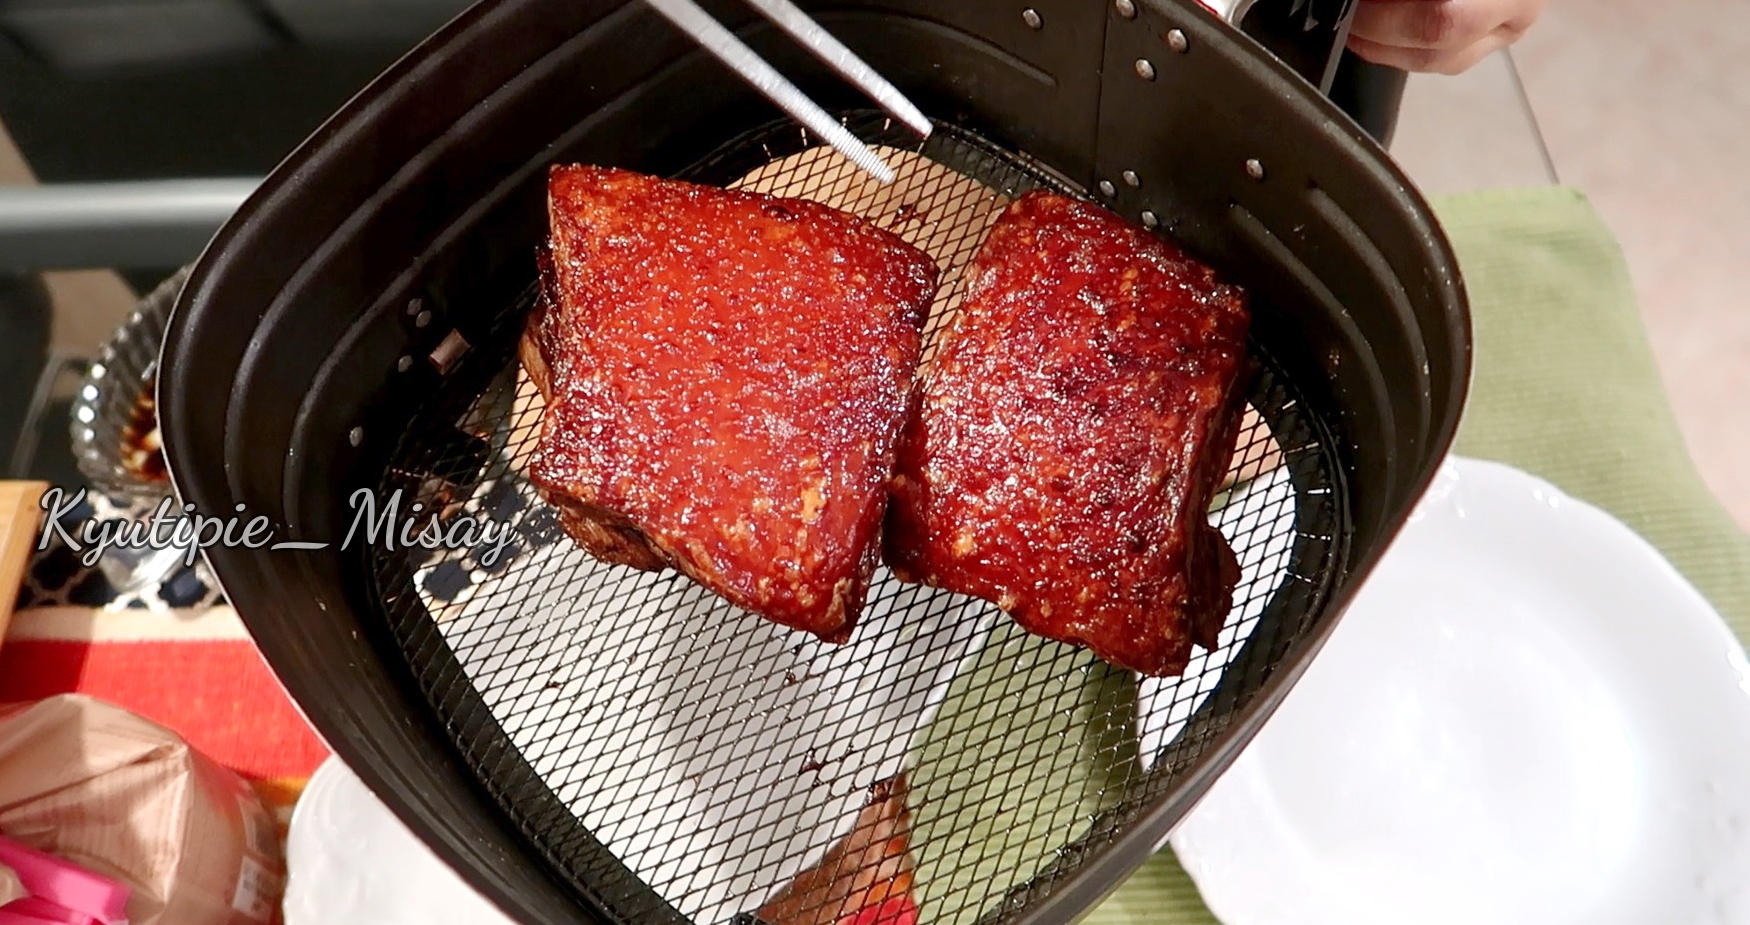
11.Remove from the air fryer and let rest a minutes before chopping into bite-sized pieces. Serve it with lechon sauce or your choice of dipping sauce.
12. Serve & Enjoy!
♥ BUY in LAZADA Together Lights Up the Moment : Up to 17% OFF + FREEBIES worth 1499
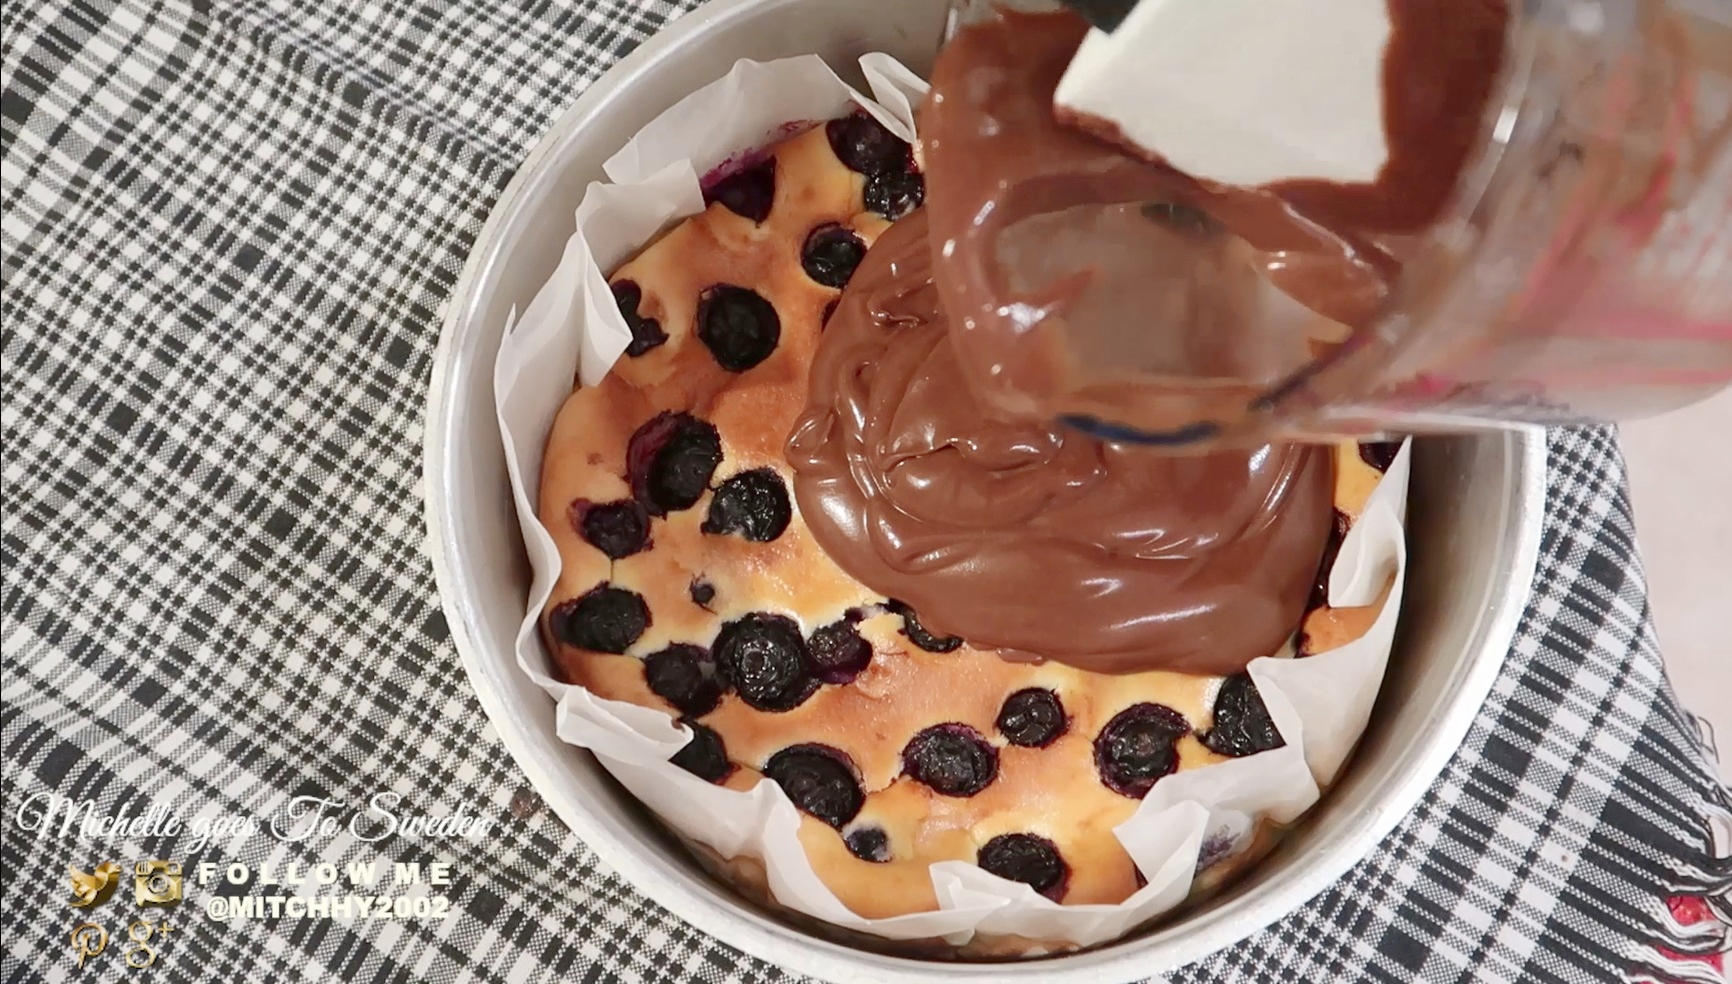
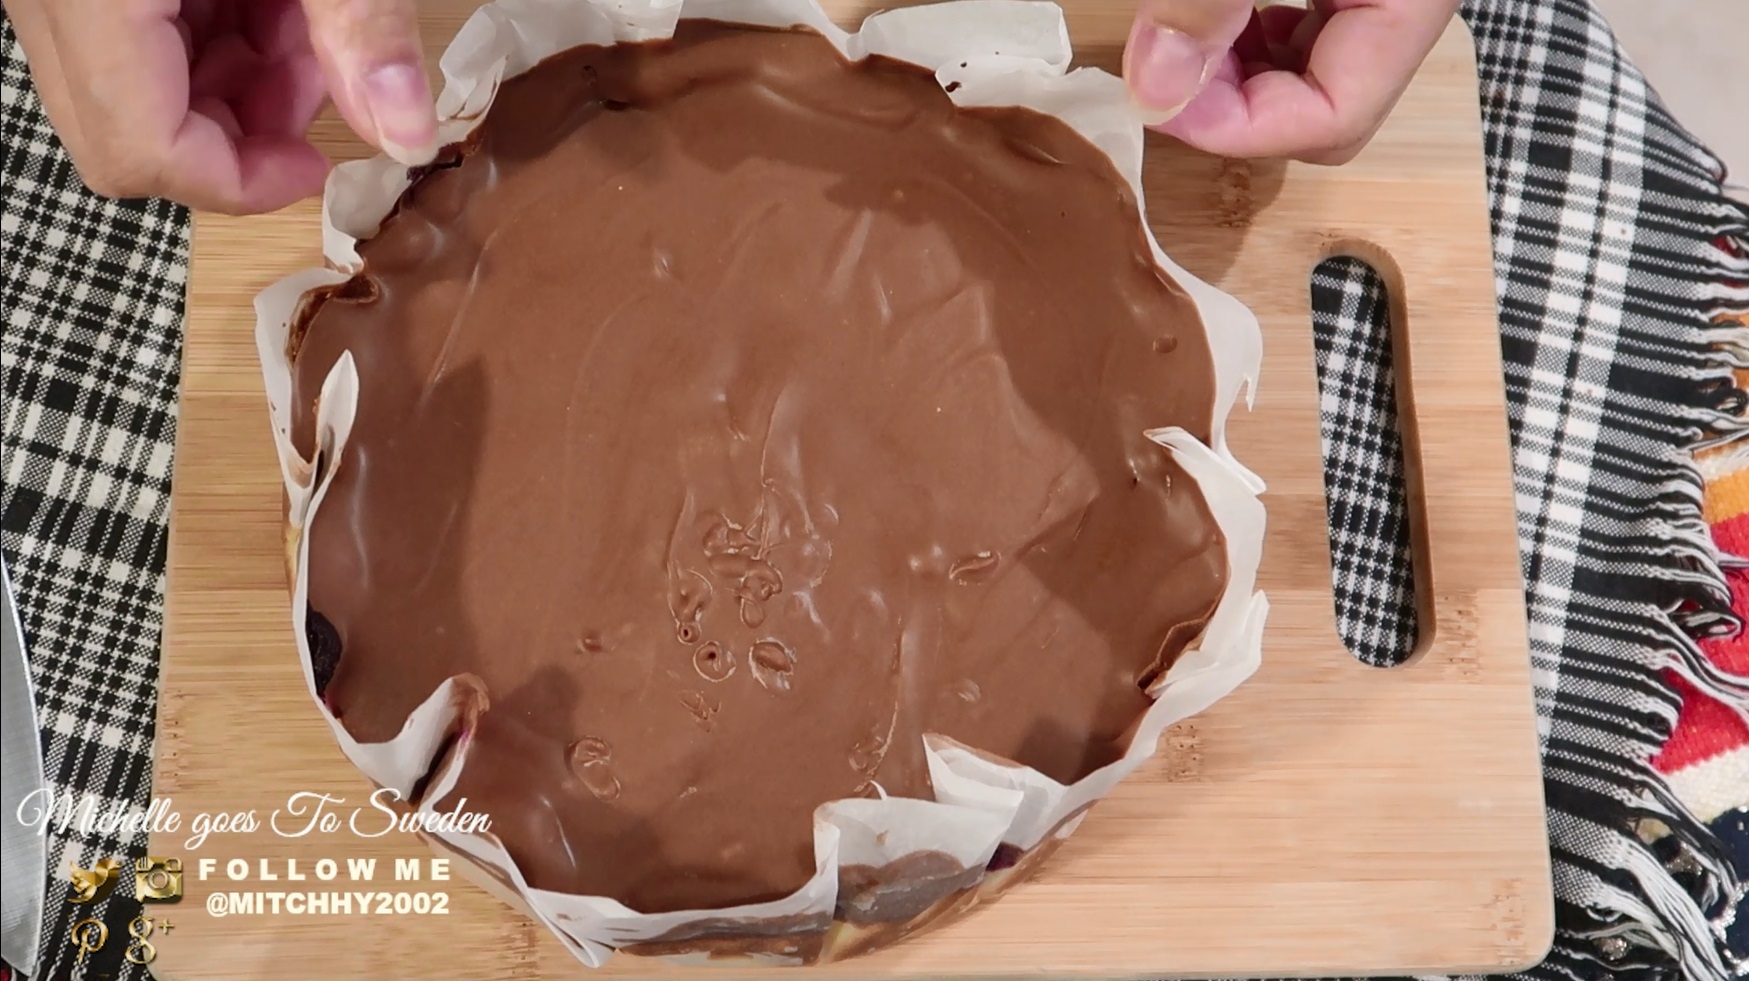
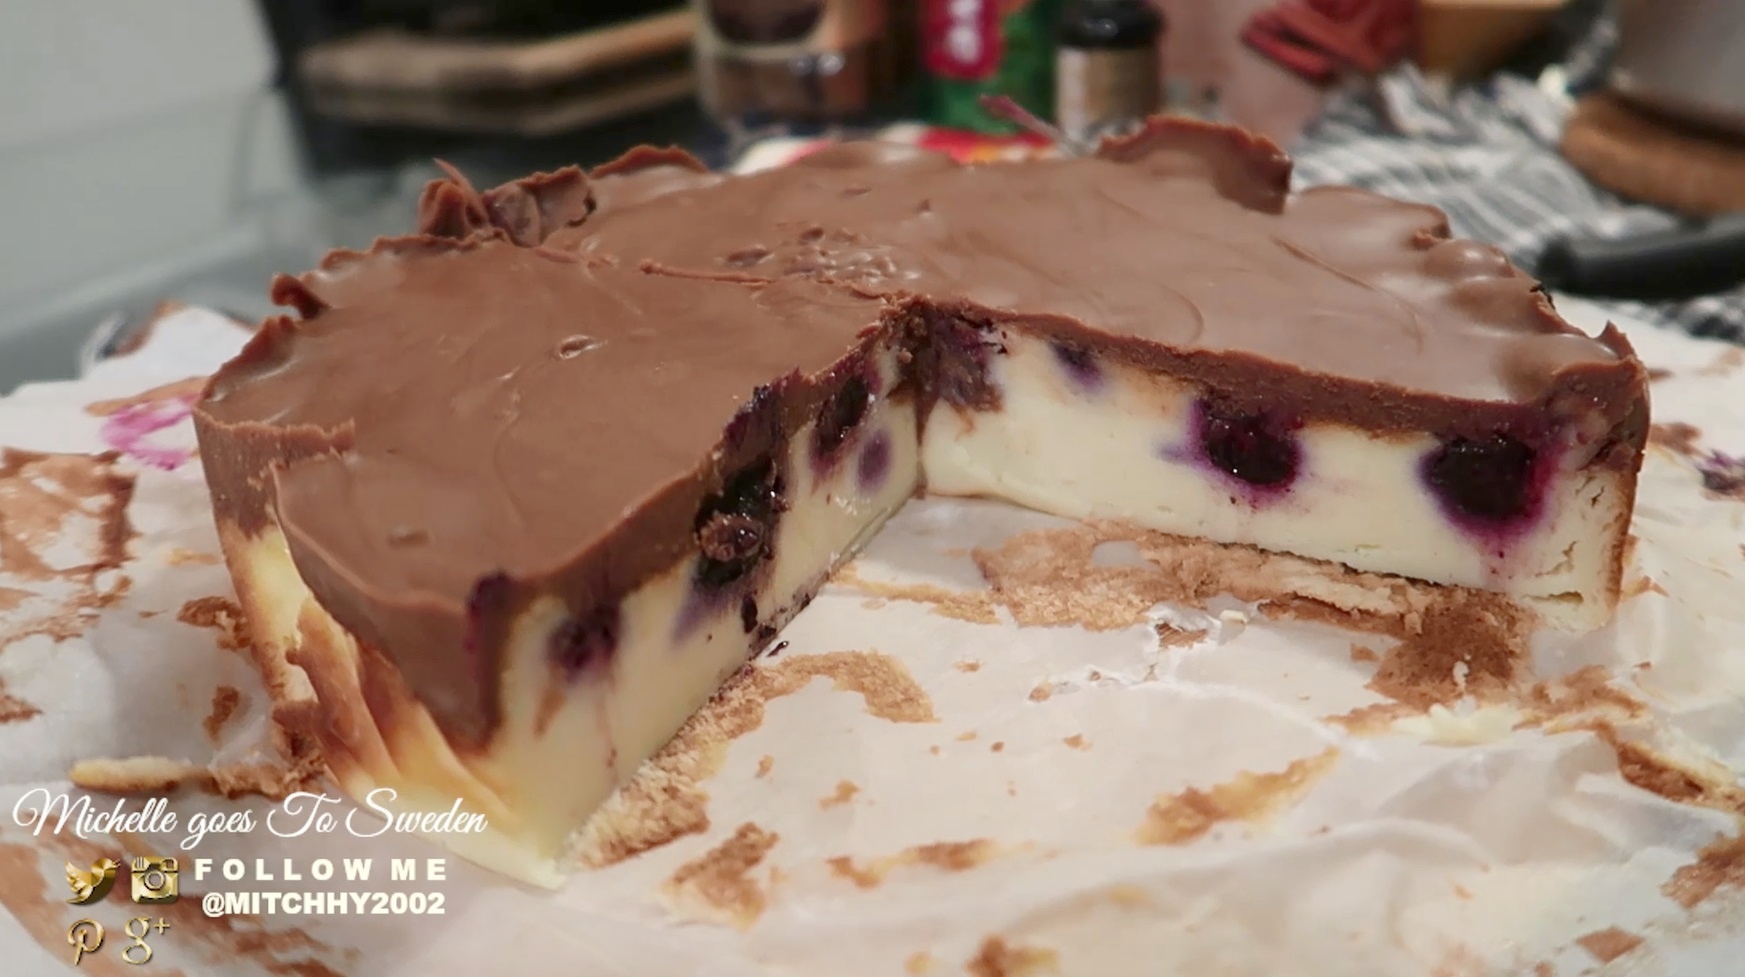
[WATCHinHD] Hello Superfriends! I’m back sa balakubak! Check out my easy cheese cake recipe in airfryer. I made the blue berry cheese cake with chocolate ganache on top! So yumy and easy to make! Hope you’ll try and like my easy cheesecake recipe. Let me know in comment section whatcha think about it. XOXO
The air fryer that I’m using is PHILIPS AIRFRYER XXL COLLECTION – HD9650
Om du vill veta mer om produkten på djupet, kolla den officiella Philips Sverige webbplatsen👇:
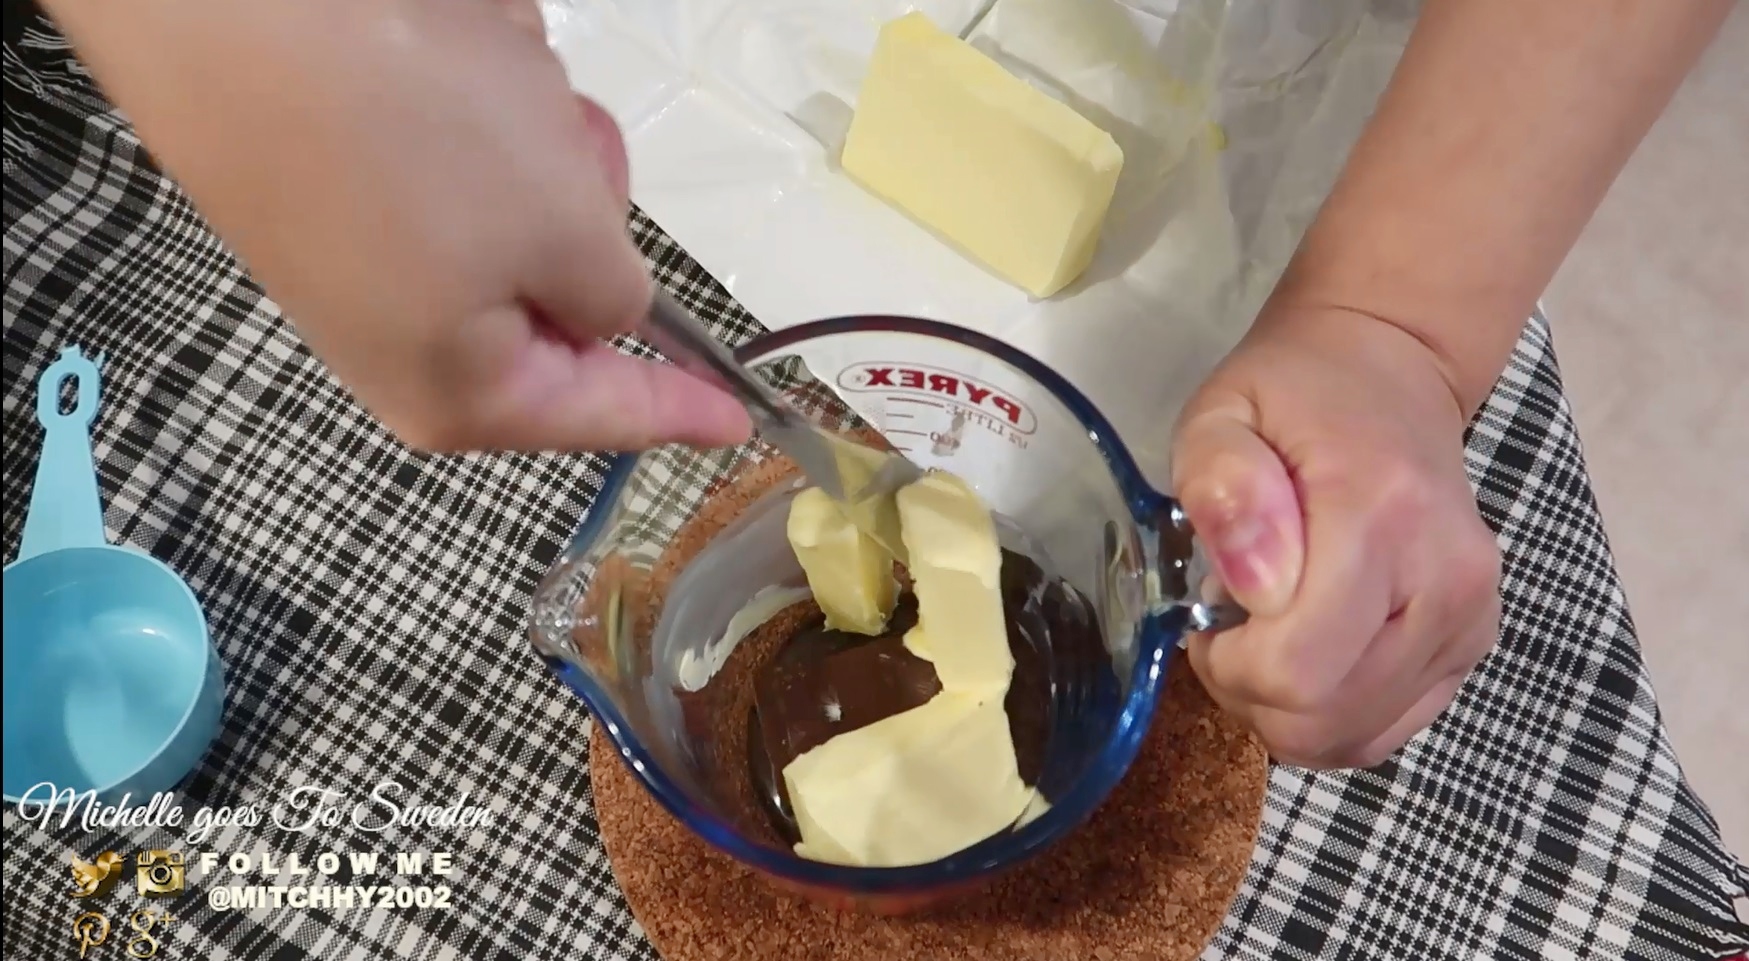
CHOCOLATE GANACHE
50g Butter
50g Chocolate
1dl heavy cream ( Vispgrädde Arla)
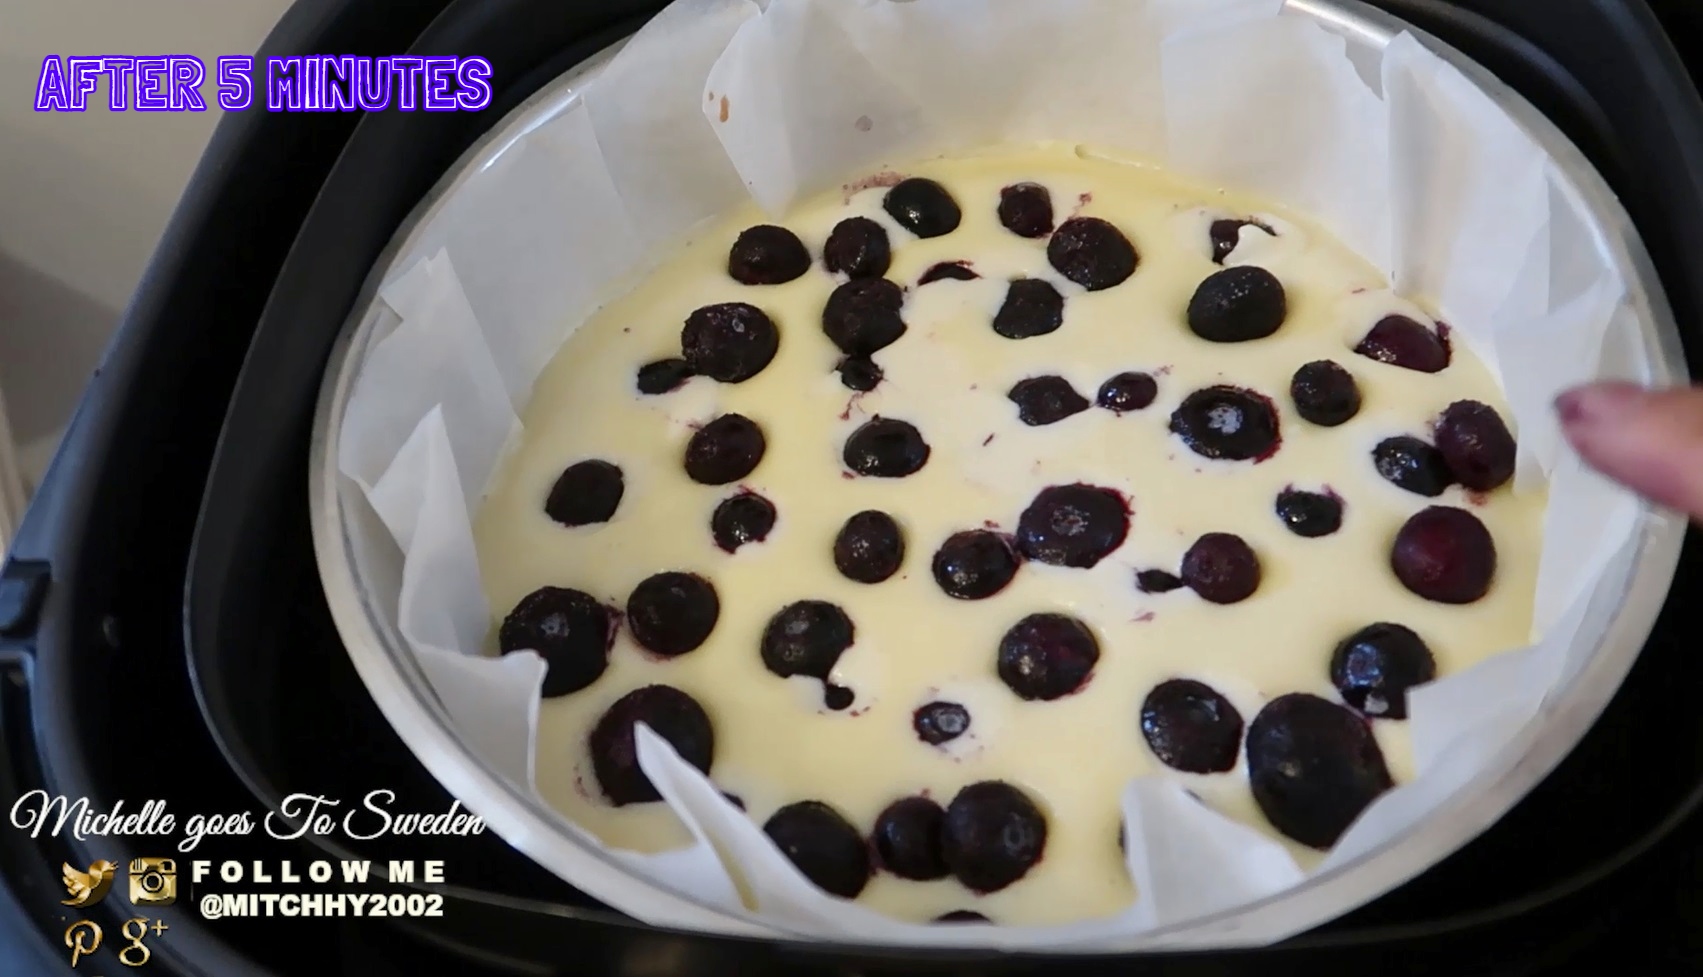
Preheat airfryer at 180° for 5 mins Bake for 25 mins.
☀INSTRUCTIONS:
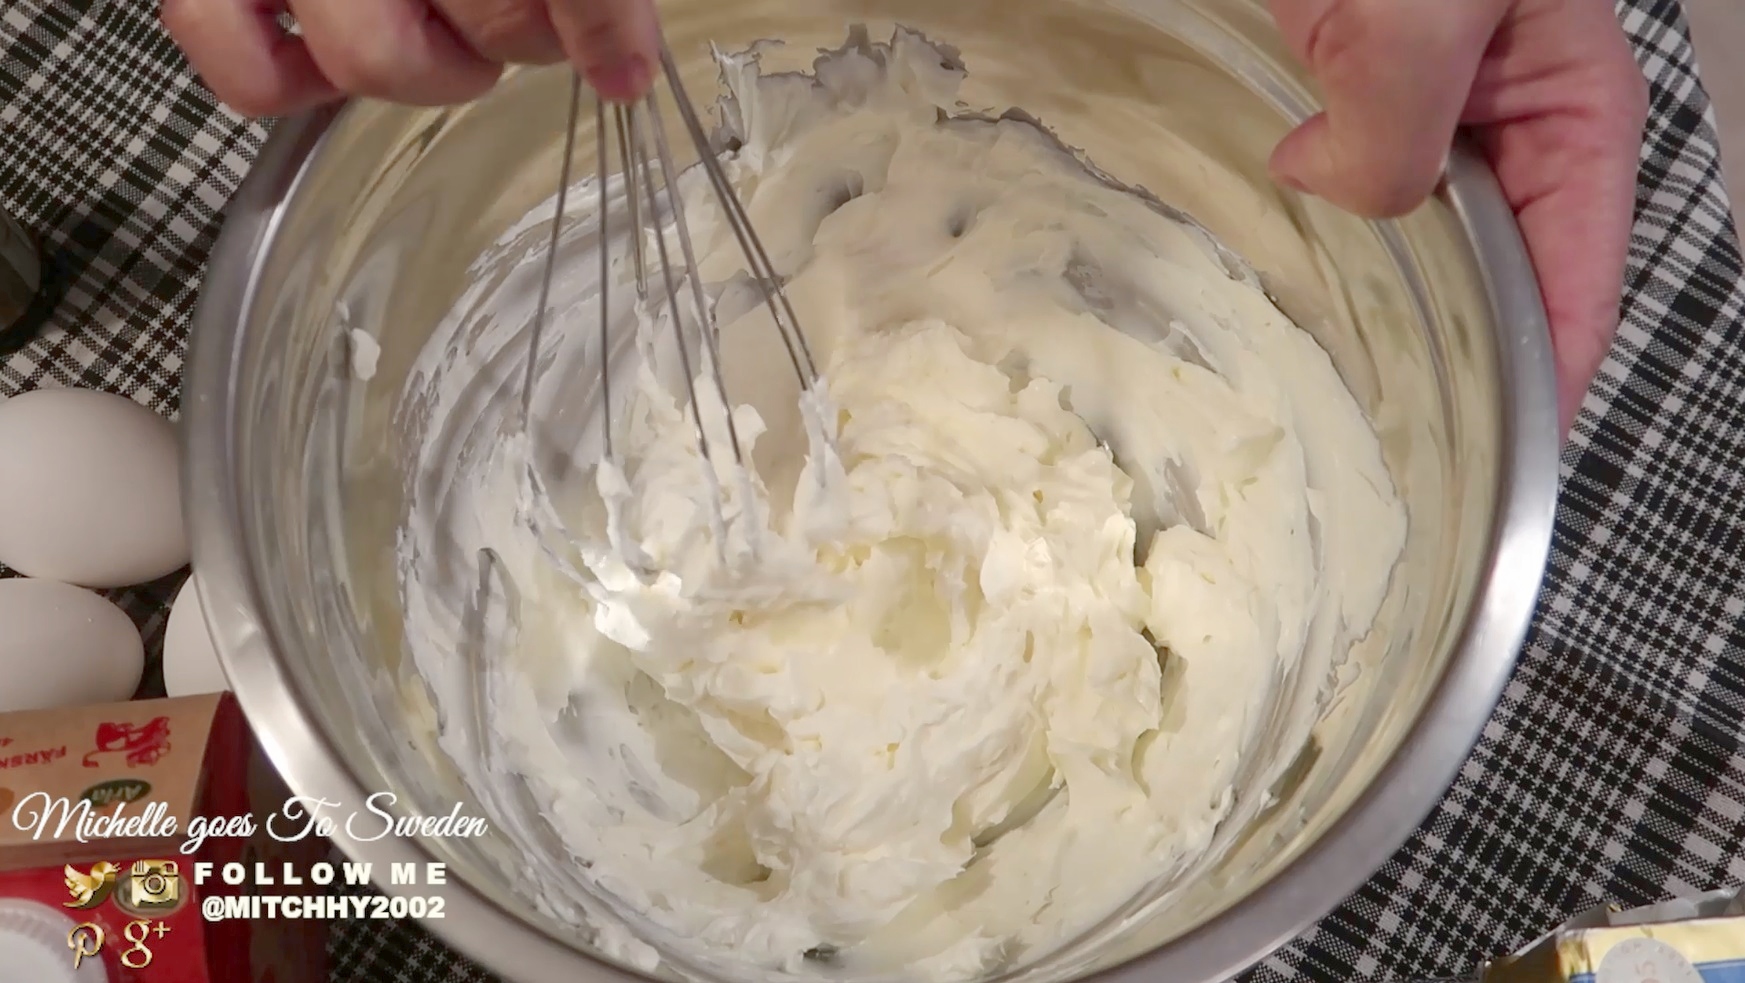
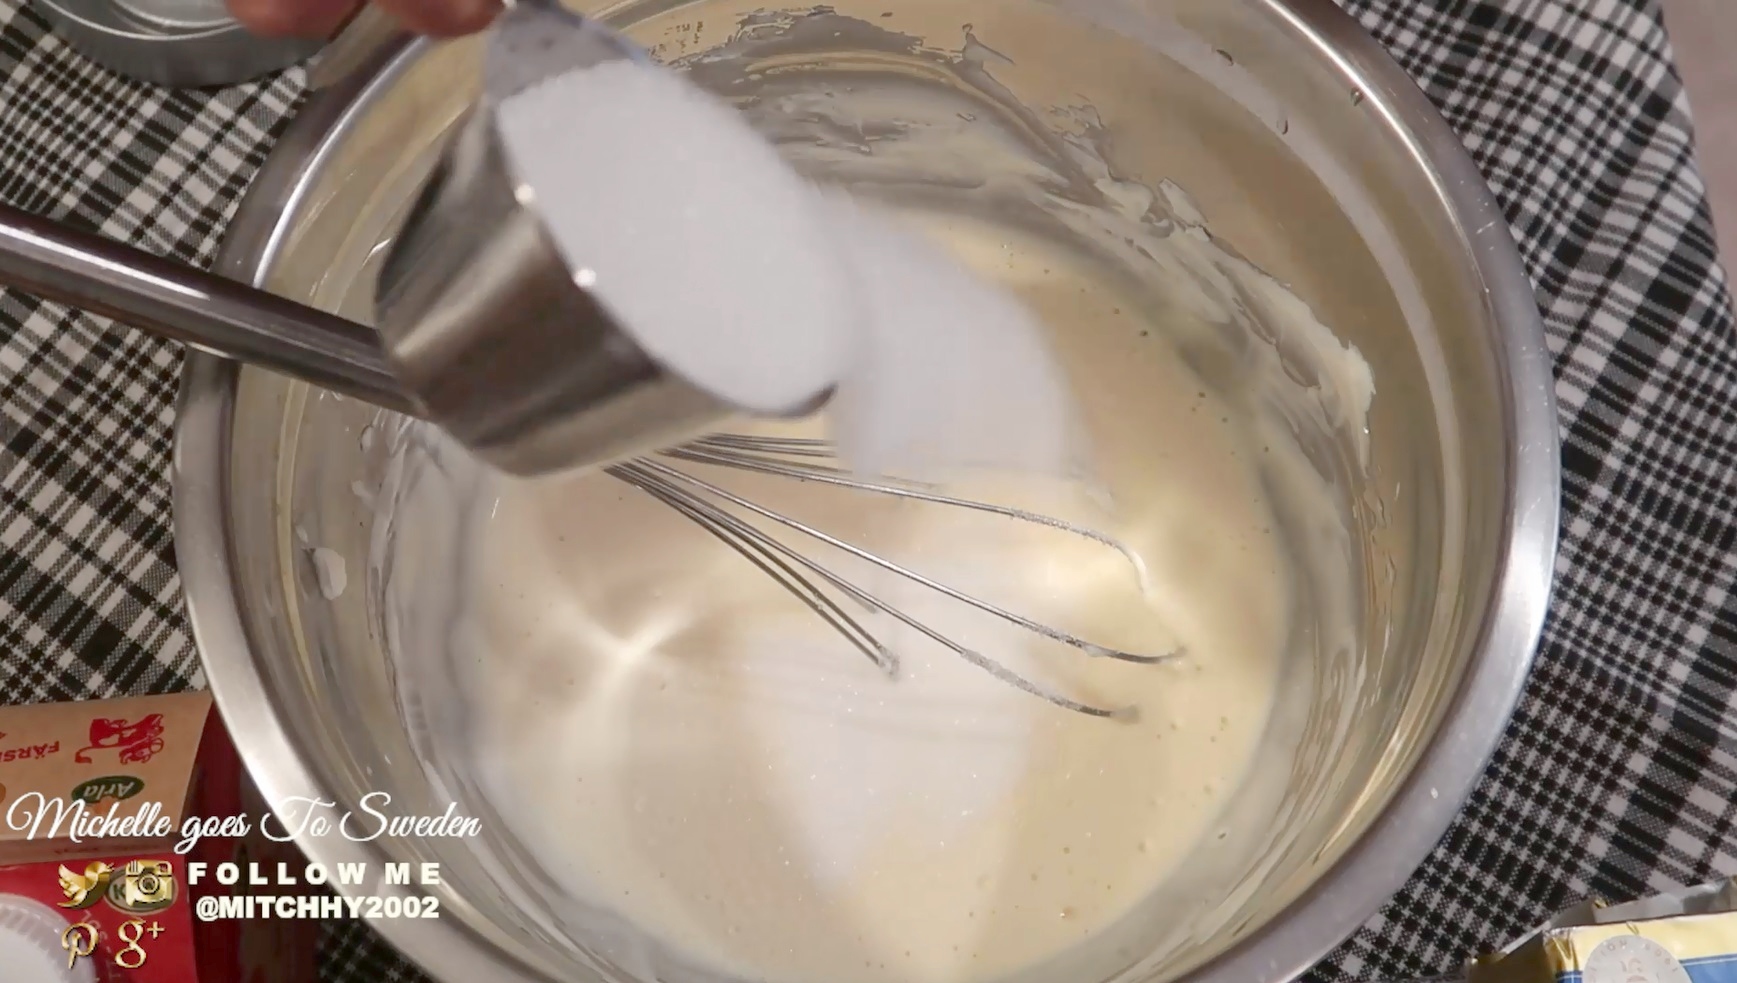
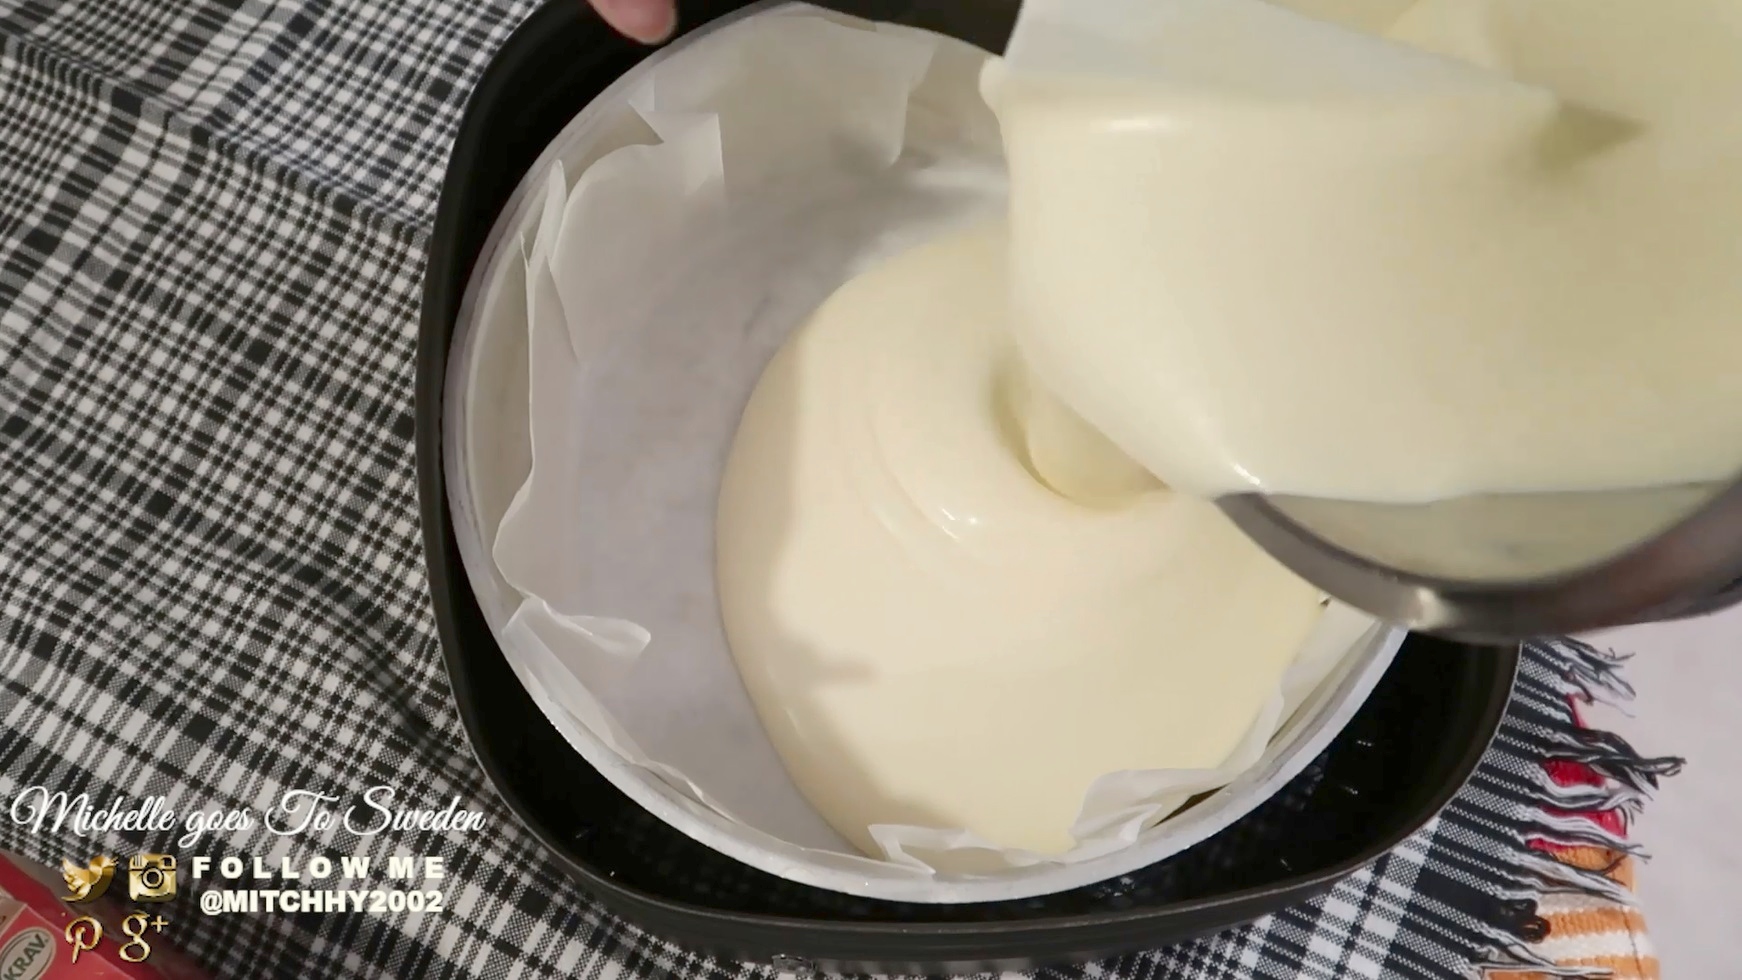
1. Soften the cream cheese to room temperature.
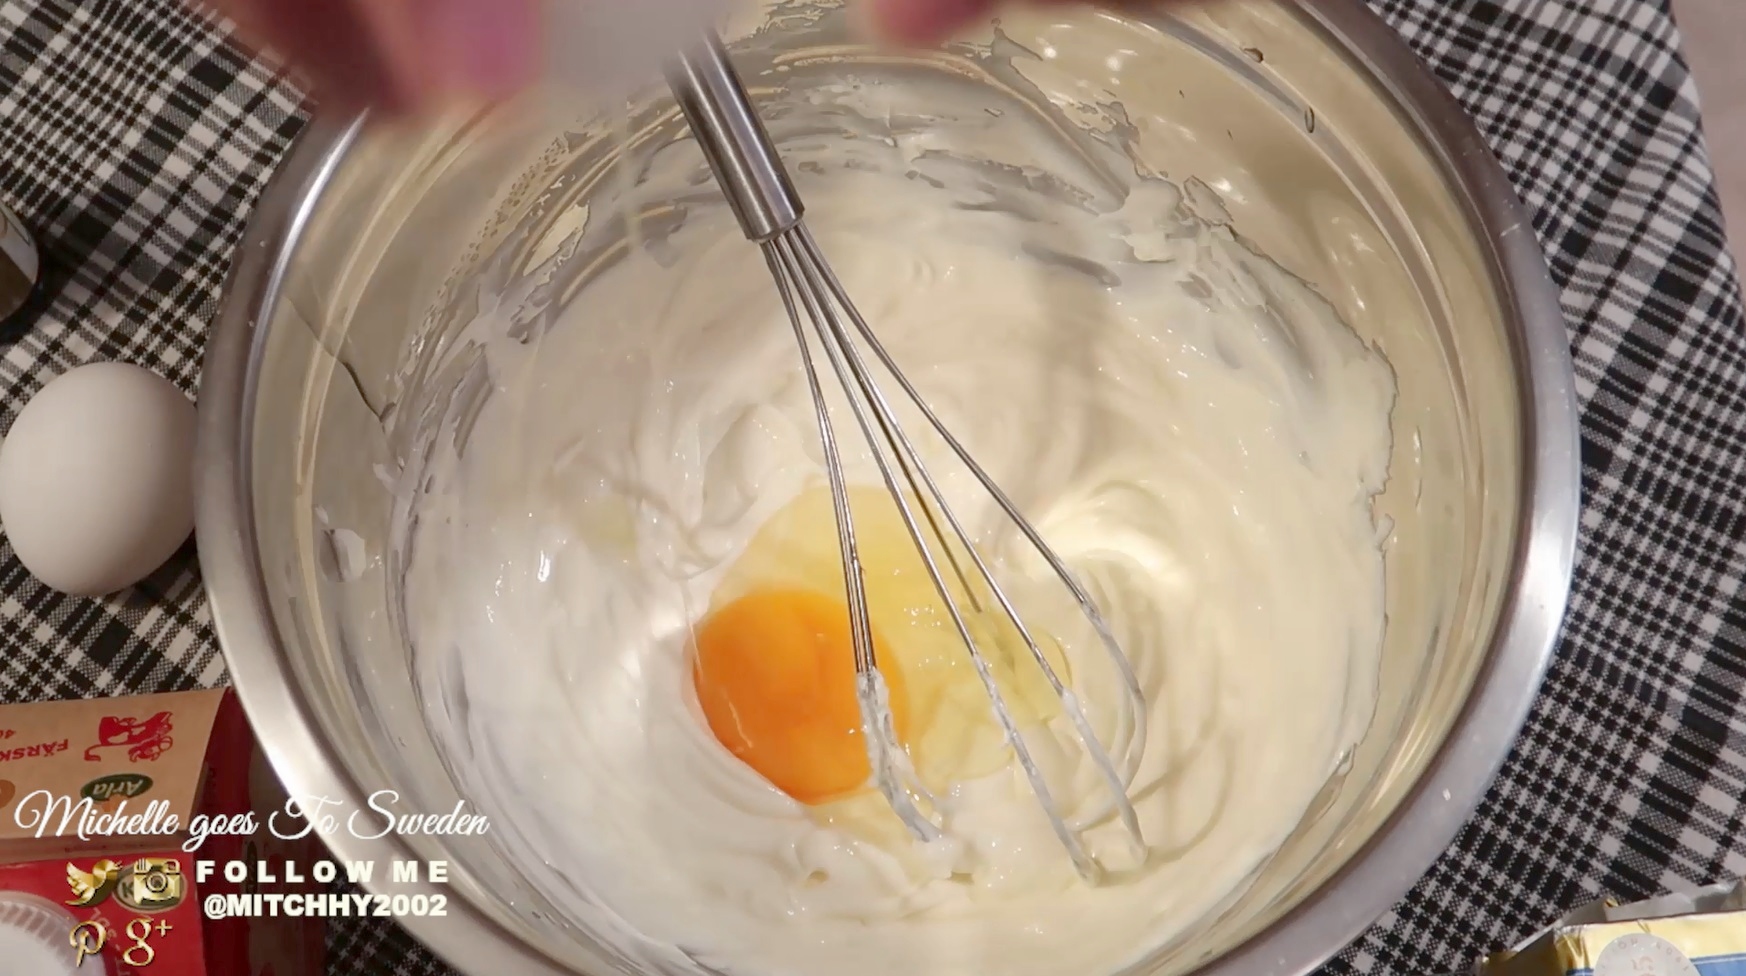
2.Add the whole eggs and mix well. Add eggs one at a time.
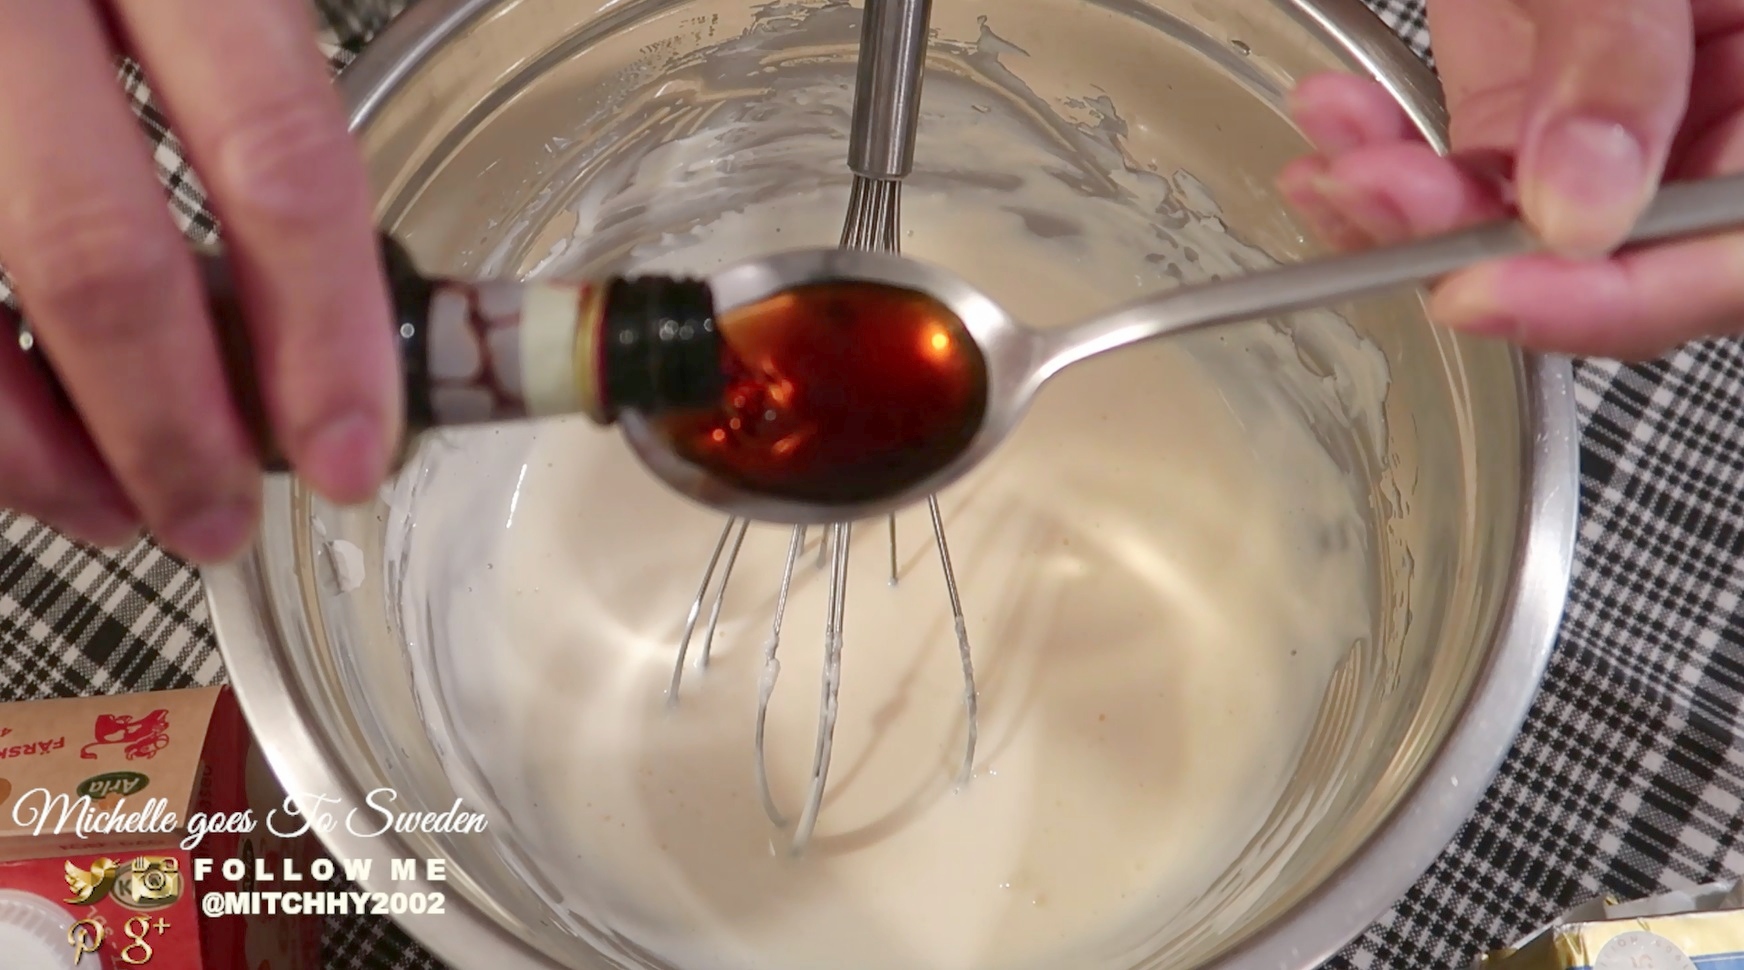
3.Add the 1tbsp of vanilla extract, and beat until combined.
4.Beat the cream cheese and Add 100g of sugar until all the sugar is dissolved.
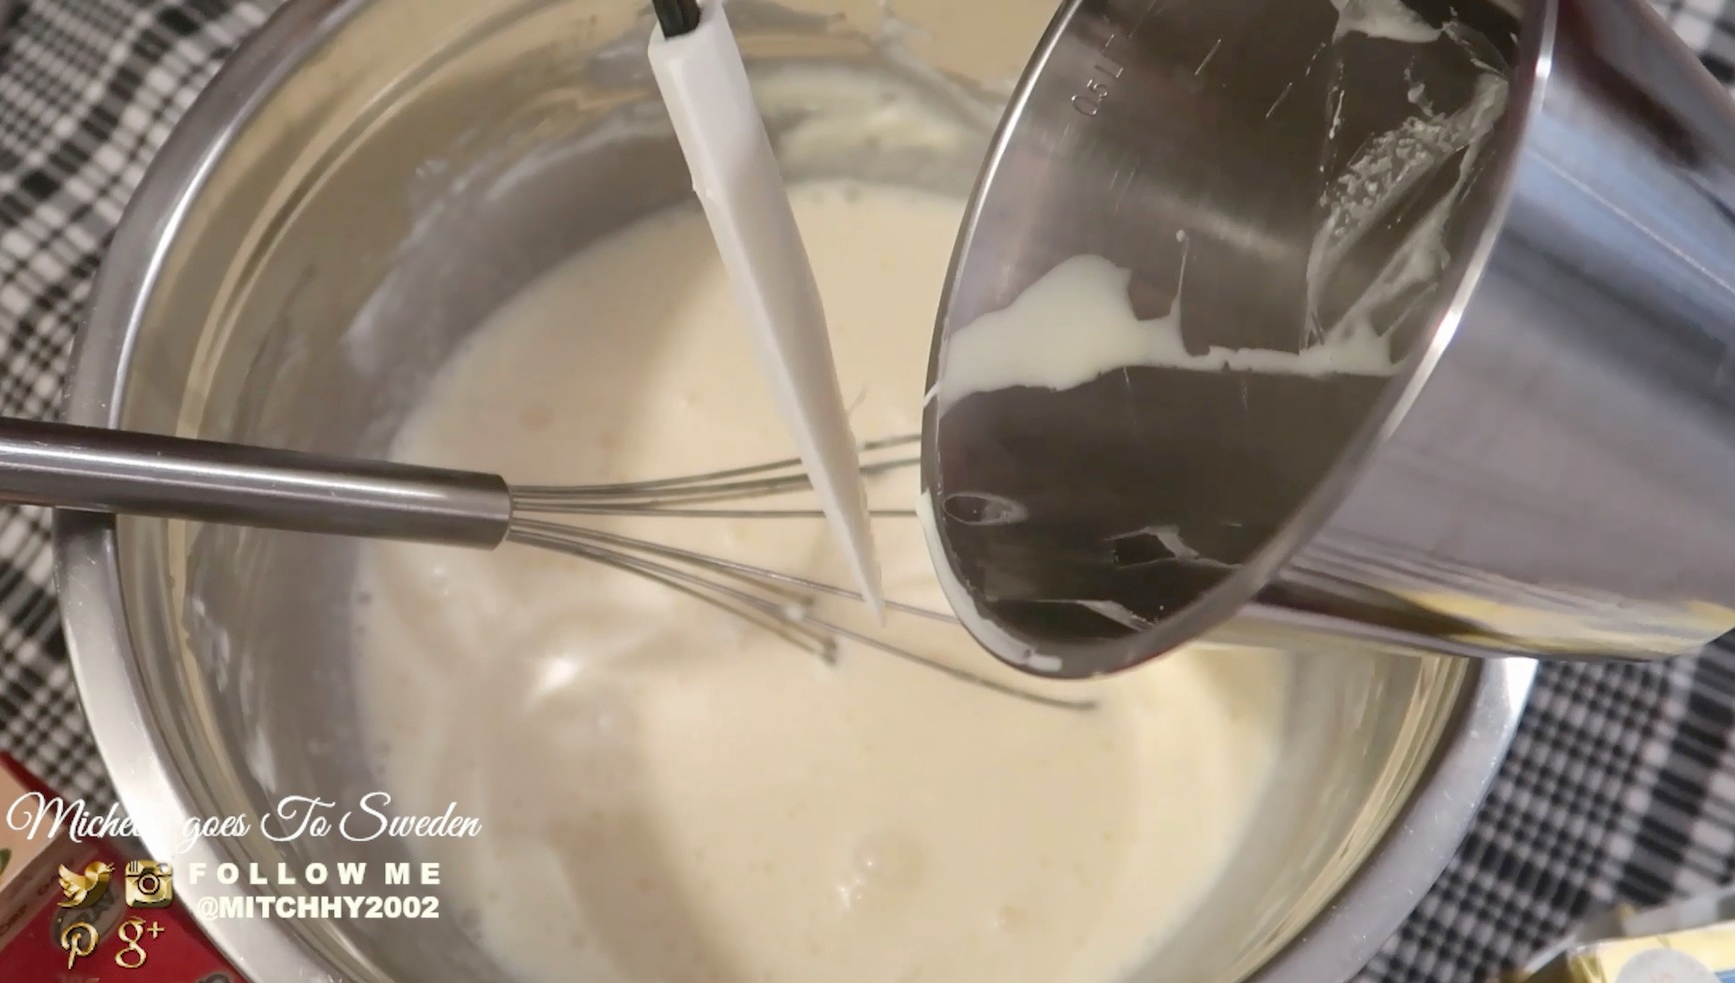
5.Carefully add the 125 ml of heavy cream/whipping cream
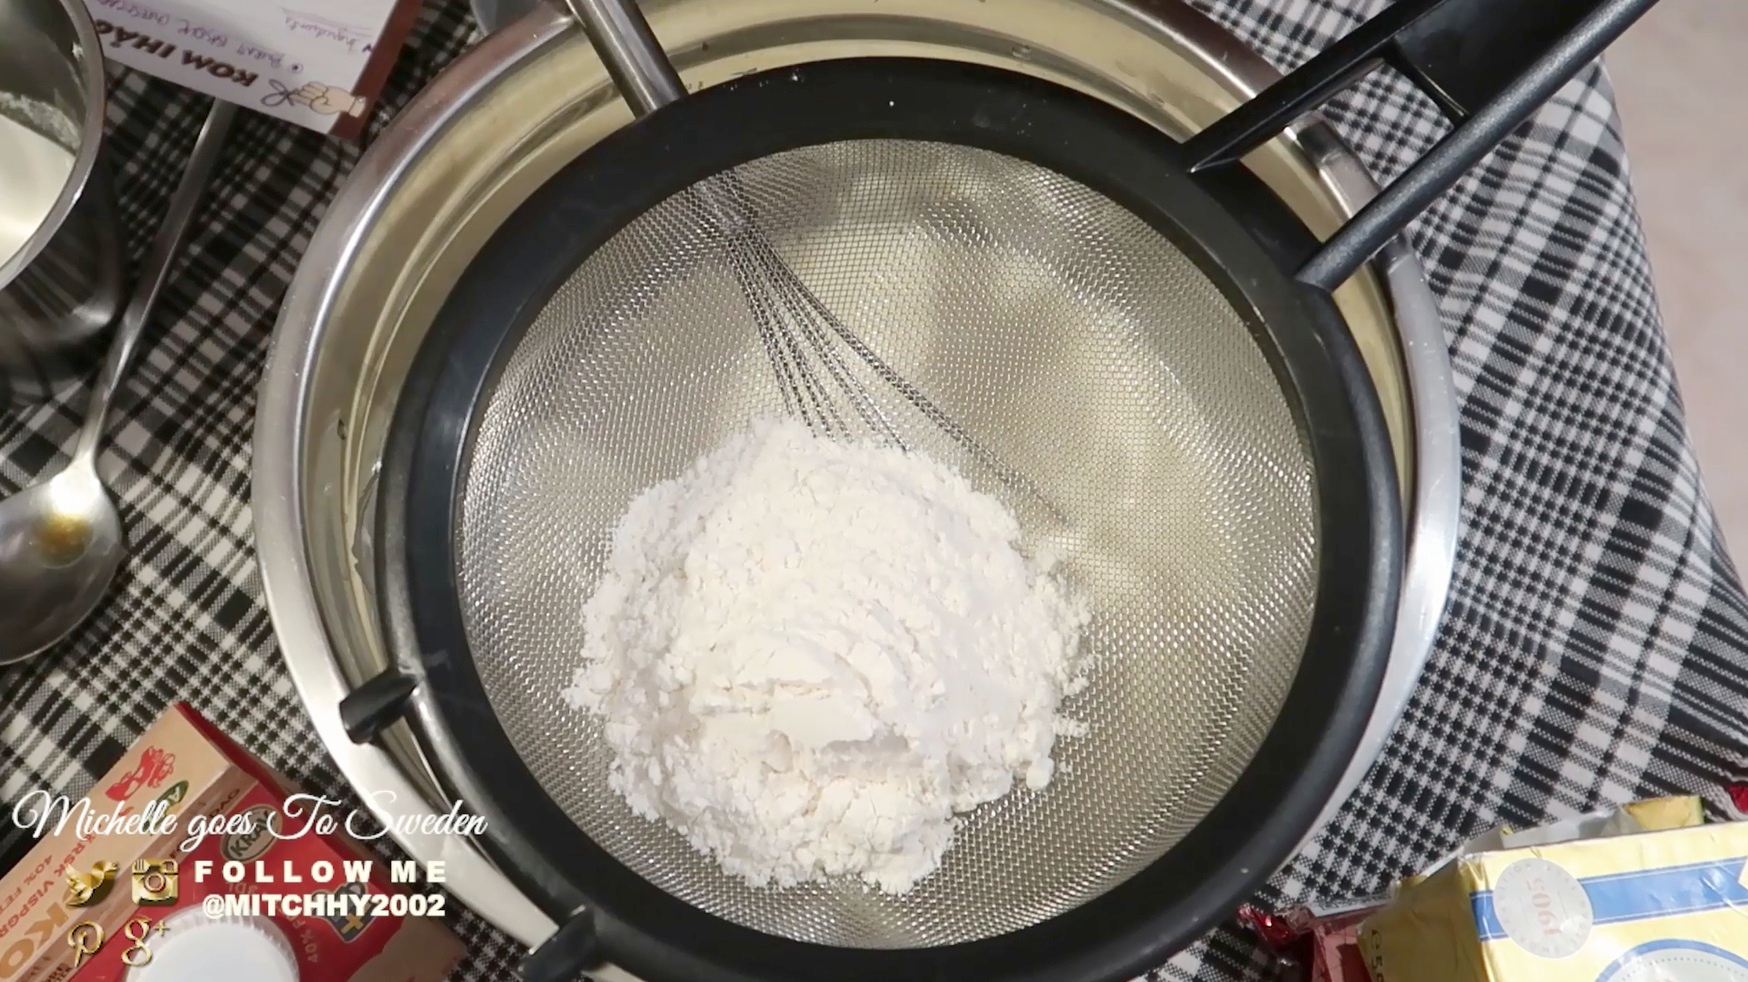
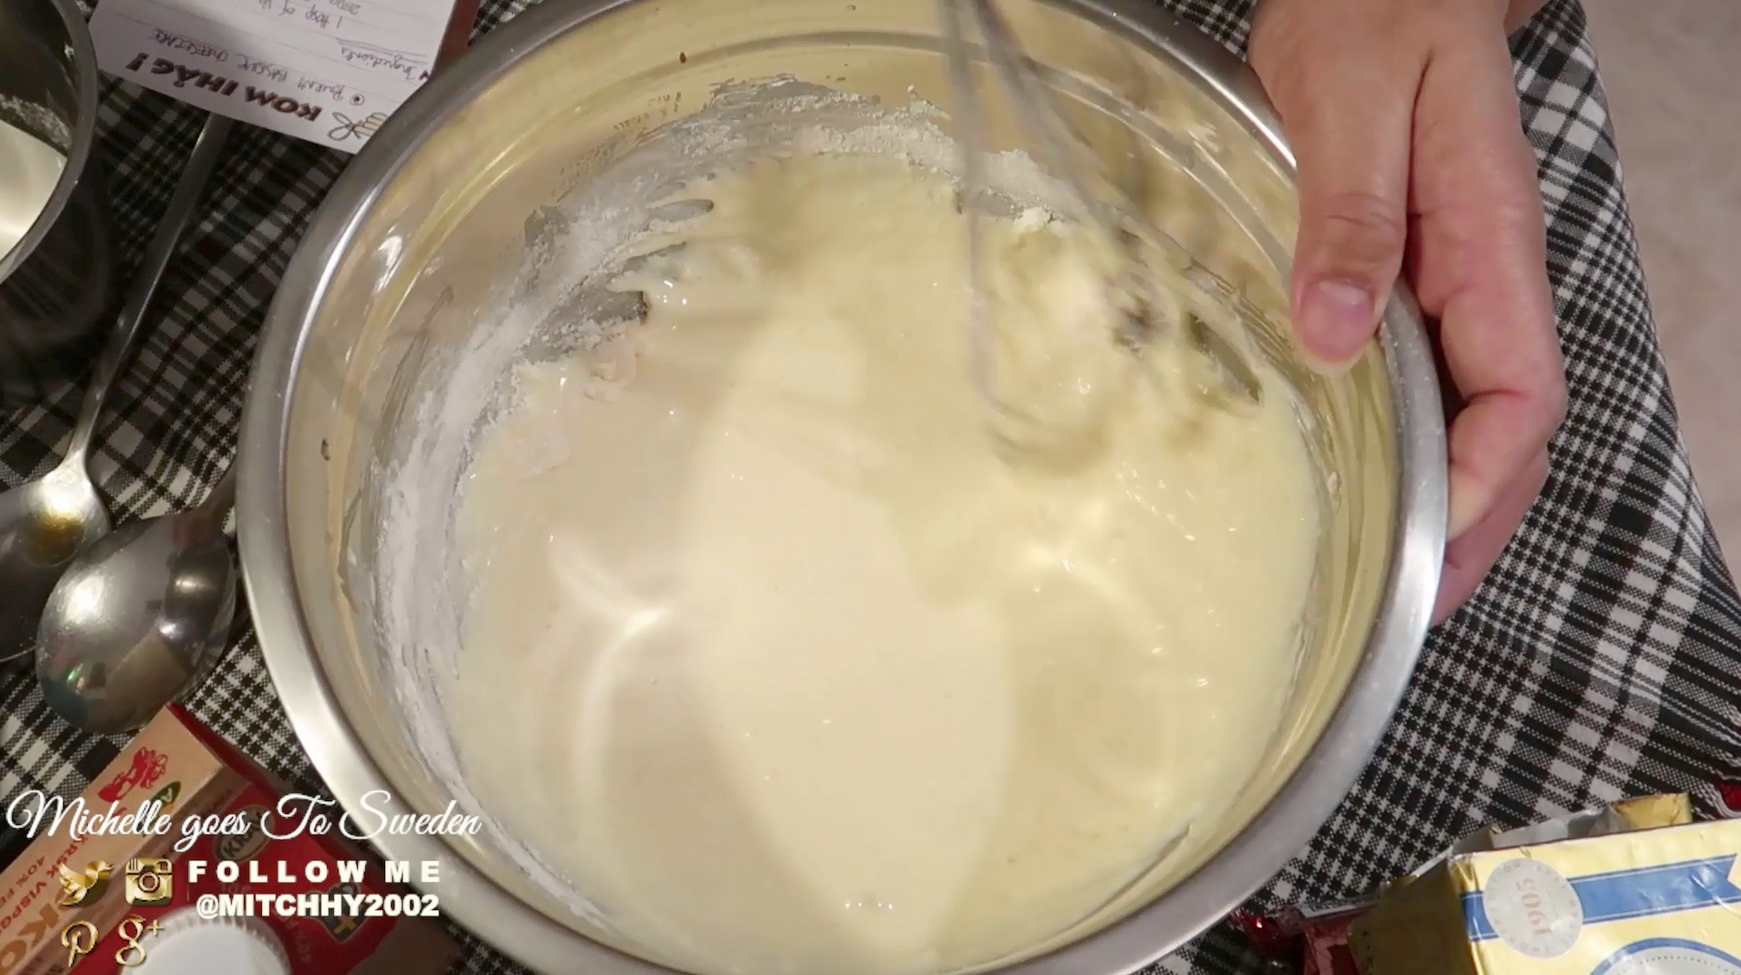
6.Sift the flour evenly onto the cream cheese mixture. Beat until well combined.
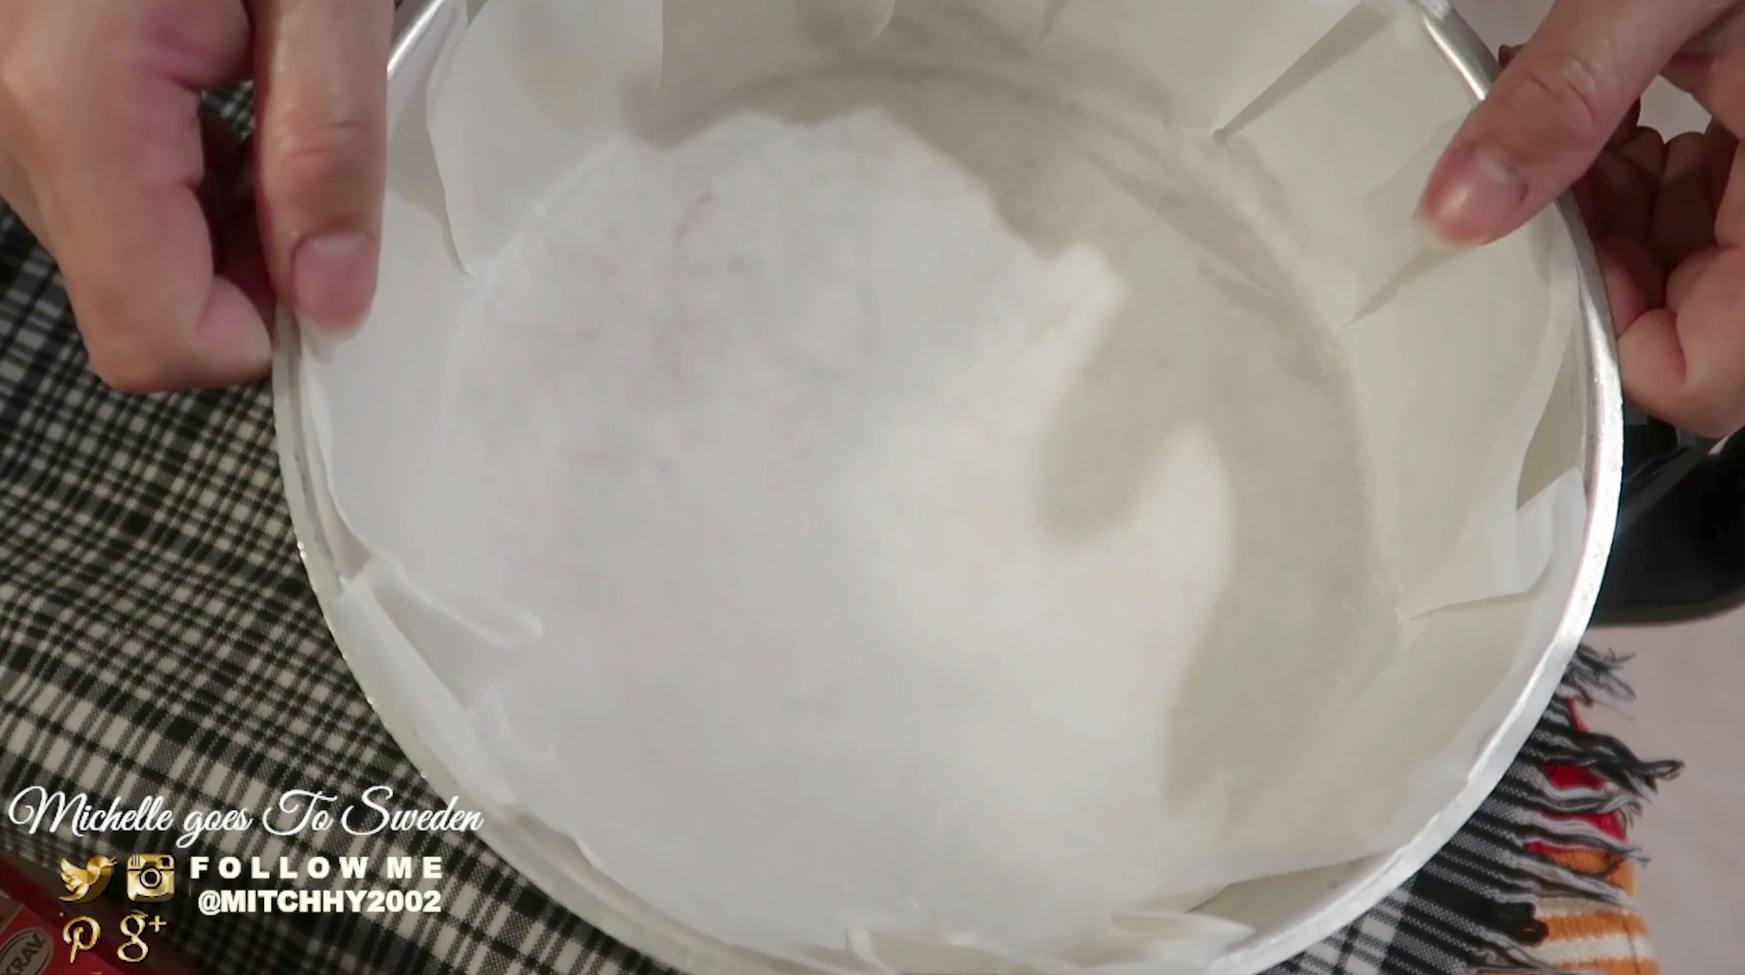
7.Pour the batter into a round pan, lined with baking paper.
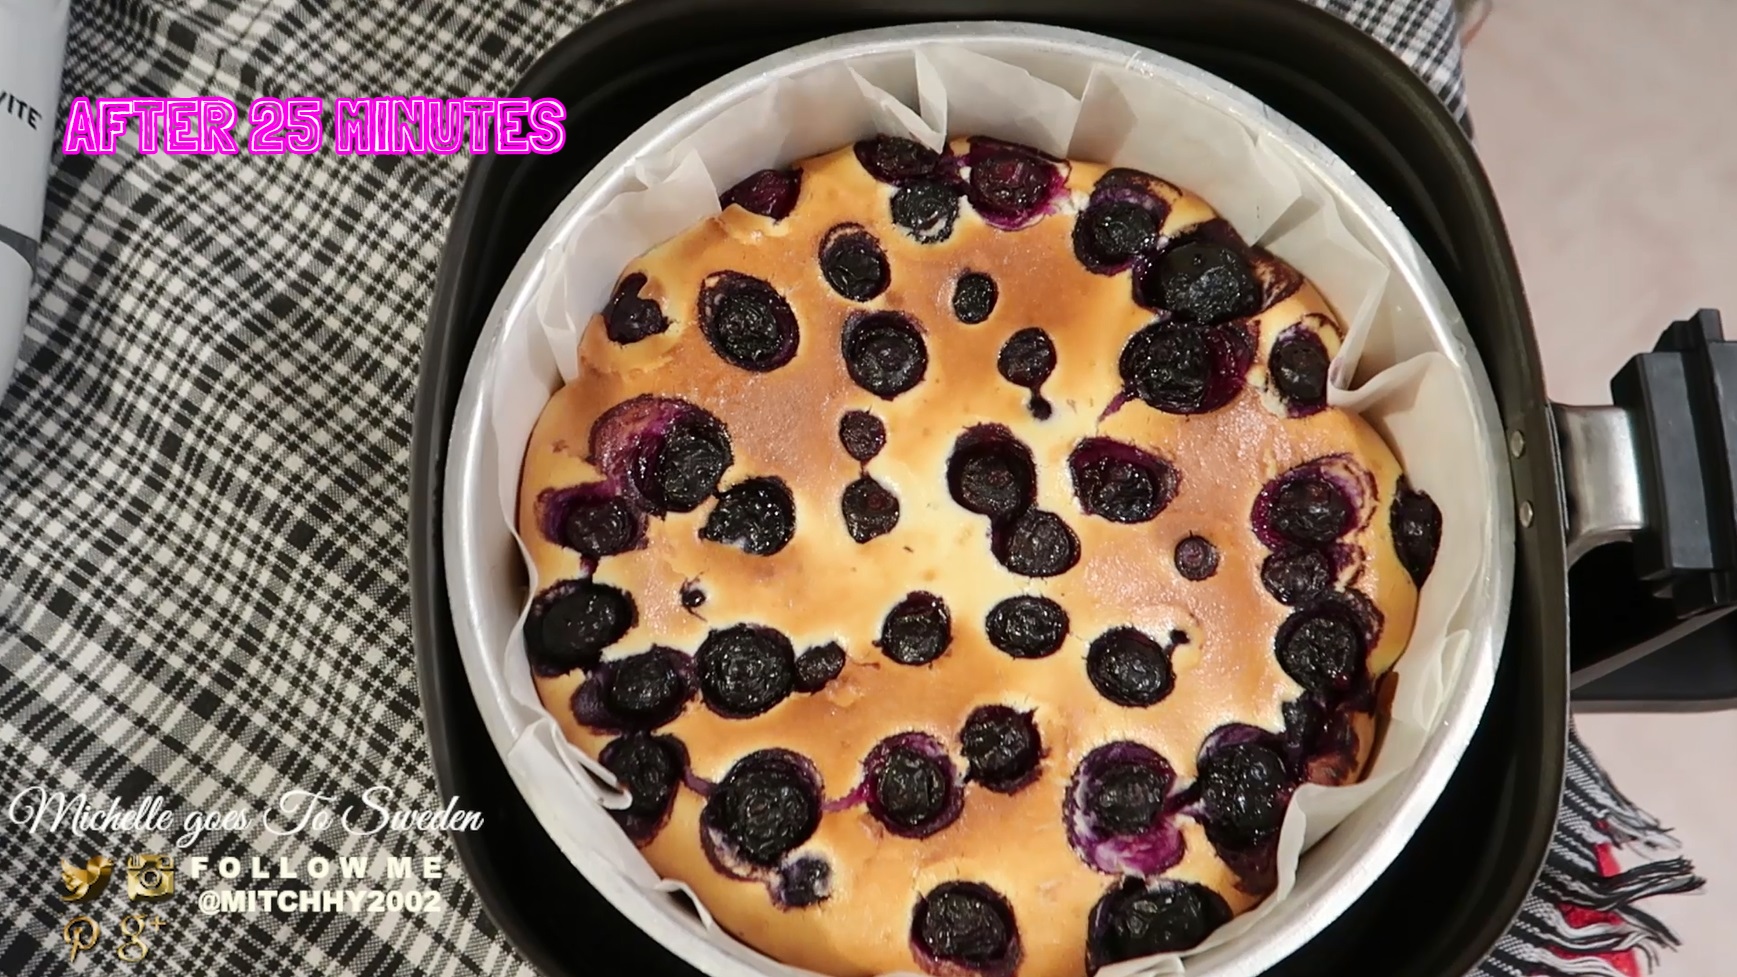
8.Preheat the air fryer to 180°C for 5 minutes. Bake the cheesecake in the air fryer at 180°C for 25 minutes or until golden brown.
9.After 5minutes you can now add the frozen blueberry.
10.After 25 minutes. Cool the cheesecake on a rack without removing the mold.
11. While waiting for the cheesecake to finish, we can move on in making the
☀ Chocolate Ganache.
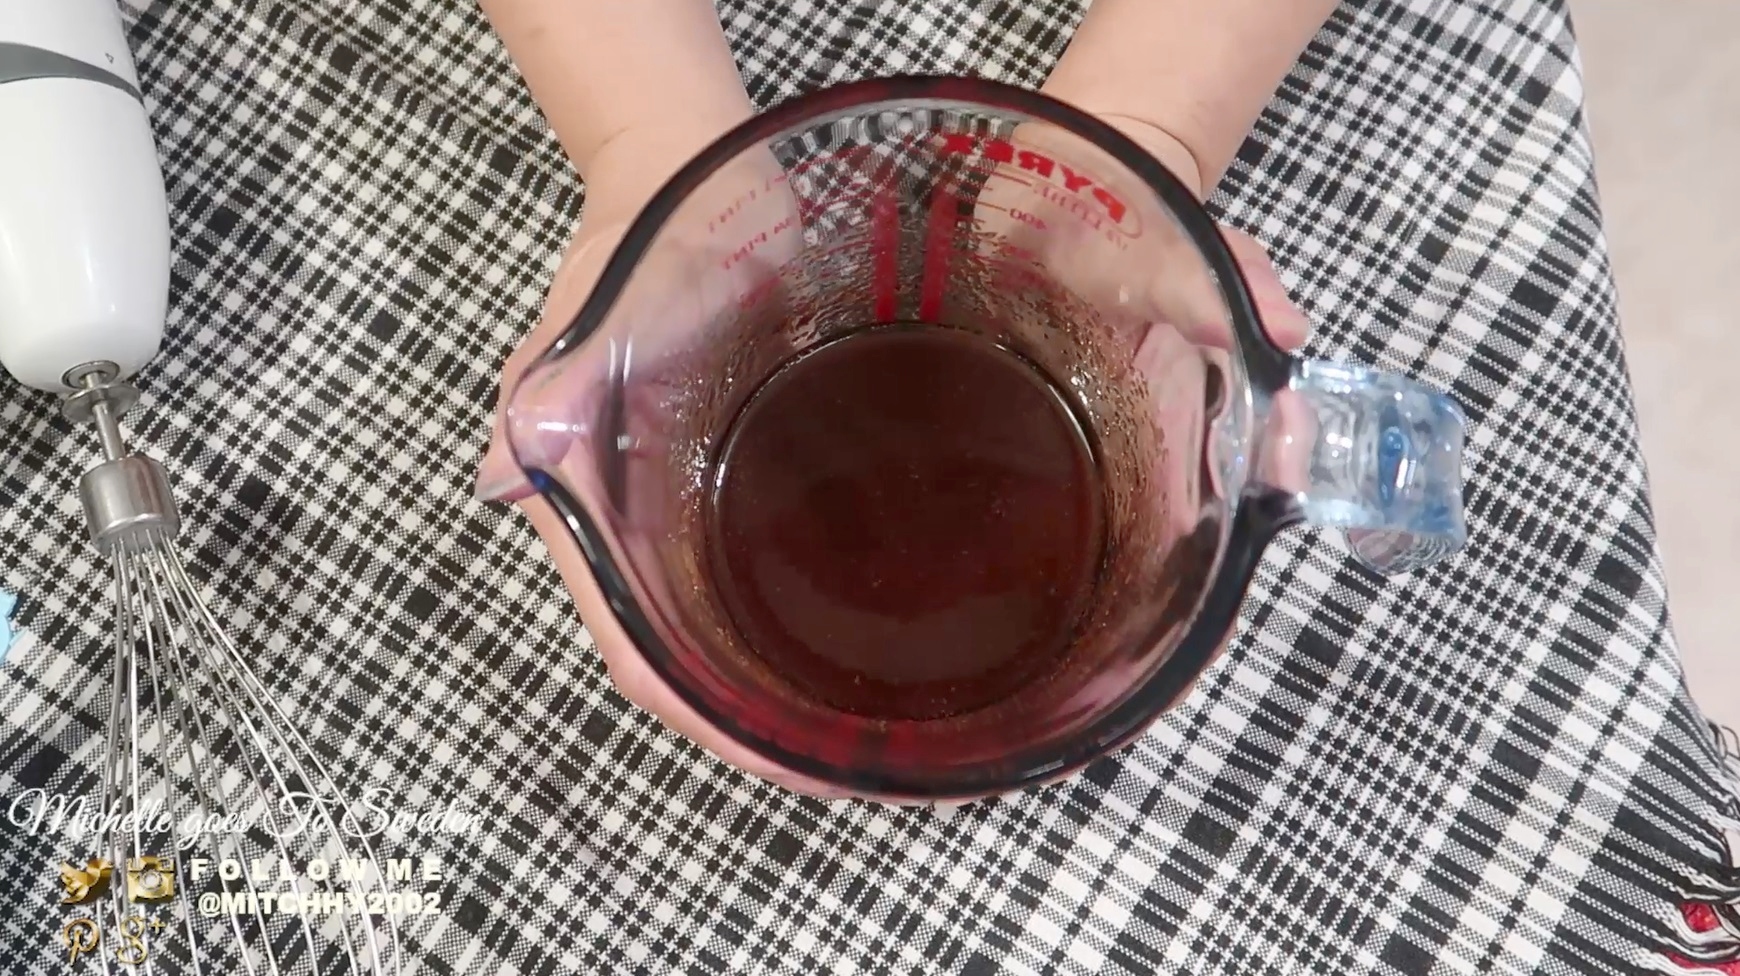
1. Combine 50g of butter and 50g of chocolate bar and melt it in the microwave. Chop chocolate into small pieces. The smaller the better, to guarantee a smooth melt;
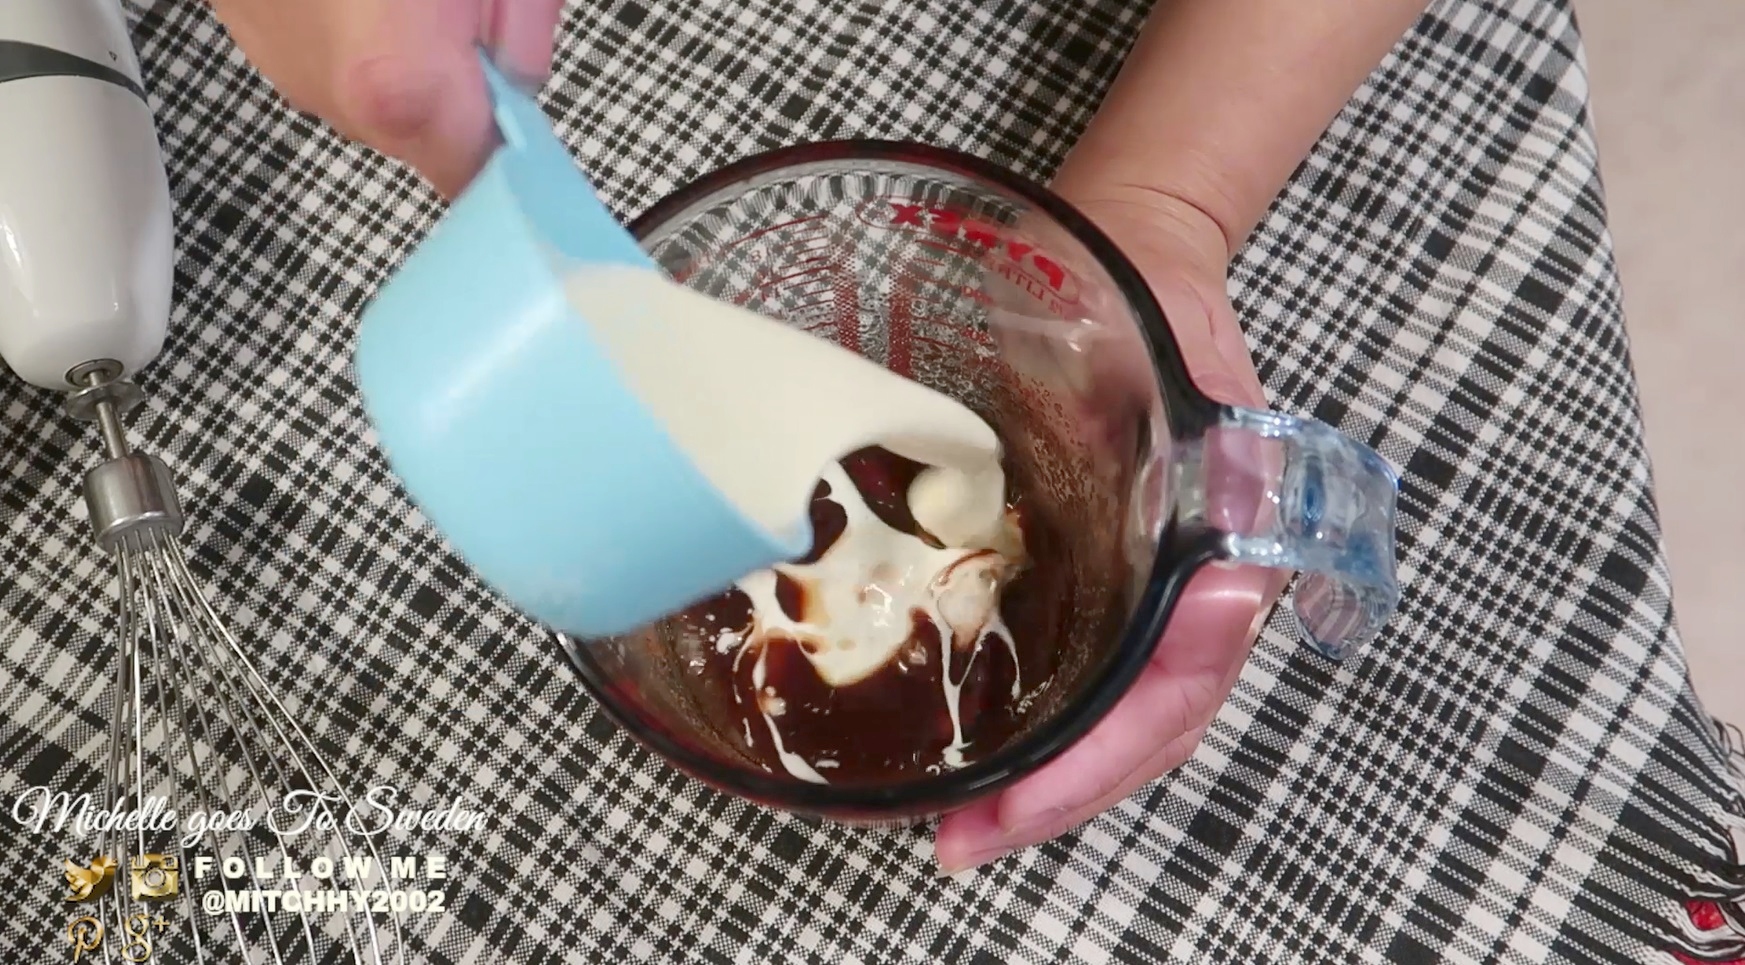
2. Once melted let it cool.
3. Then pour the whipping cream, mix to combine the cream and chocolate until it becomes a smooth and glossy chocolate sauce.
4. Once finish pour it on top the cheese cake.
5. Chill and serve.
*The cheesecake can be made one day in advance and chilled in the fridge.
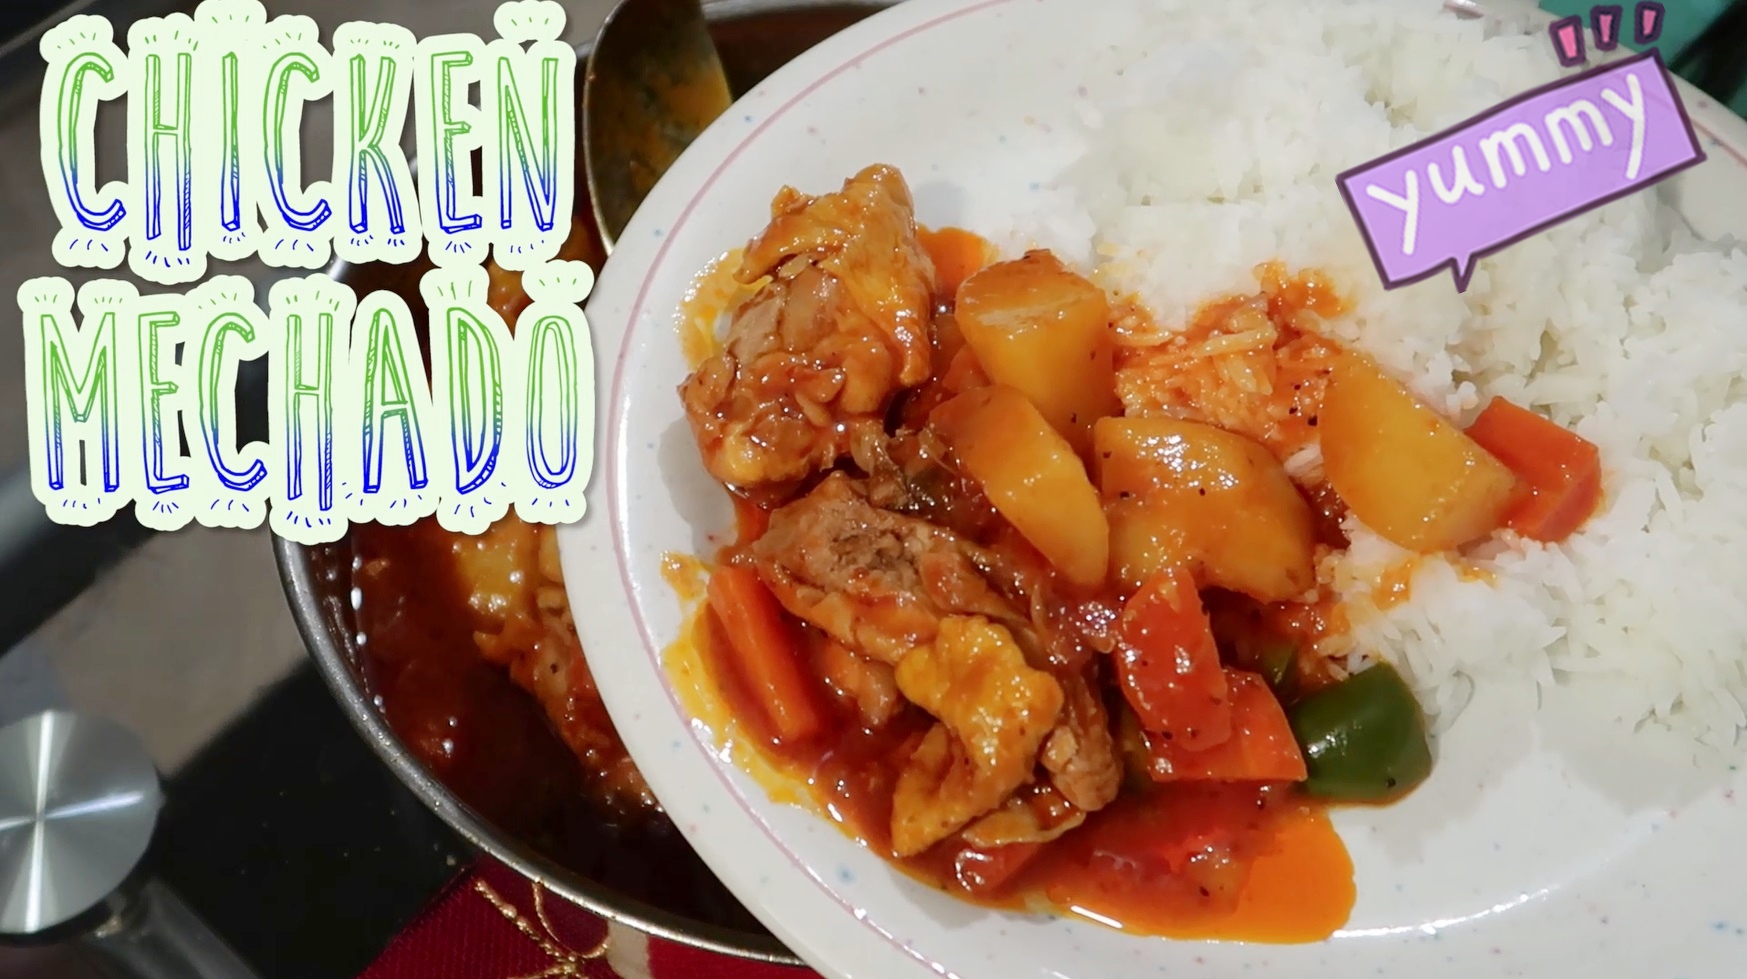
My own recipe of CHICKEN MECHADO Filipino style. Simple and easy to cook. Hope you like my recipe and let me know in the comment section below if you also like Chicken mechado.
Ingredients:
🌺 4 pcs chicken breast cut into small (breast, drumsticks or wings)
🌺 2 cloves garlic , chopped
🌺 1 medium onion , chopped
🌺 3 tbsp soy sauce
🌺 2 bay leaves
🌺 1 cup water
🌺 1 green bell pepper , cut into large chunks
🌺 2 medium carrots , peeled and cut into large chunks
🌺 2 medium potatoes , peeled and cut into large chunks
🌺 1 knorr chicken cubes
🌺 1tbsp sugar
🌺 Salt
🌺 ground black pepper
🌺 oil
Cooking Procedure:
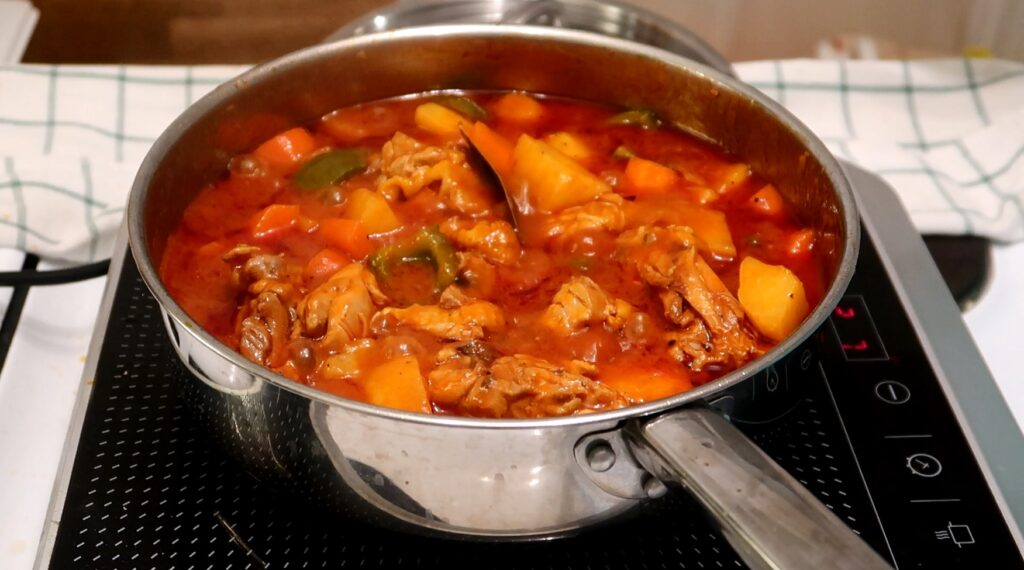
1. In a wok, saute garlic and onions.
2. Add chicken and stir fry until its color change to slightly brown.
3. Add water (just enough to cover the chicken), tomato sauce, soy sauce, laurel leaf, bell peppers, potatoes, carrots, and black peppers.
4. Bring to boil then lower the fire and simmer for at least 20~30 minutes or until the meat becomes tender. No need to add additional water if there are already enough build up of oil from chicken fats.
5. Cover the pan during cooking.
6. Finally, make a taste test.
7. Add salt seasoning if necessary
Serve while still hot.
Today I decided to film the trendy SWEATER NAILS using GEL POLISH and DIP NAIL POWDER. It is so simple and easy do plus it’s perfect for beginners just like you. Hope you enjoy!
2:06 – Jump to start the tutorial [THANKS ME LATER!]
DISCLAIMER GUYS!:I’m not a professional nail tech but I love doing my own gel nails as a hobby so please, please be calm! if you see that I apply it in a wrong way! hahaha I am not a professional so please bear with me 🙂 LOL